Introduction
As autumn's chill sets in, the allure of baked goods fills the air, inviting home cooks into their kitchens. Among these cherished recipes, apple crisp stands out for its delightful combination of tender fruit and crunchy topping. This dessert not only tastes divine but also evokes a warm, nostalgic feeling, making it a favorite for family gatherings and cozy evenings alike.
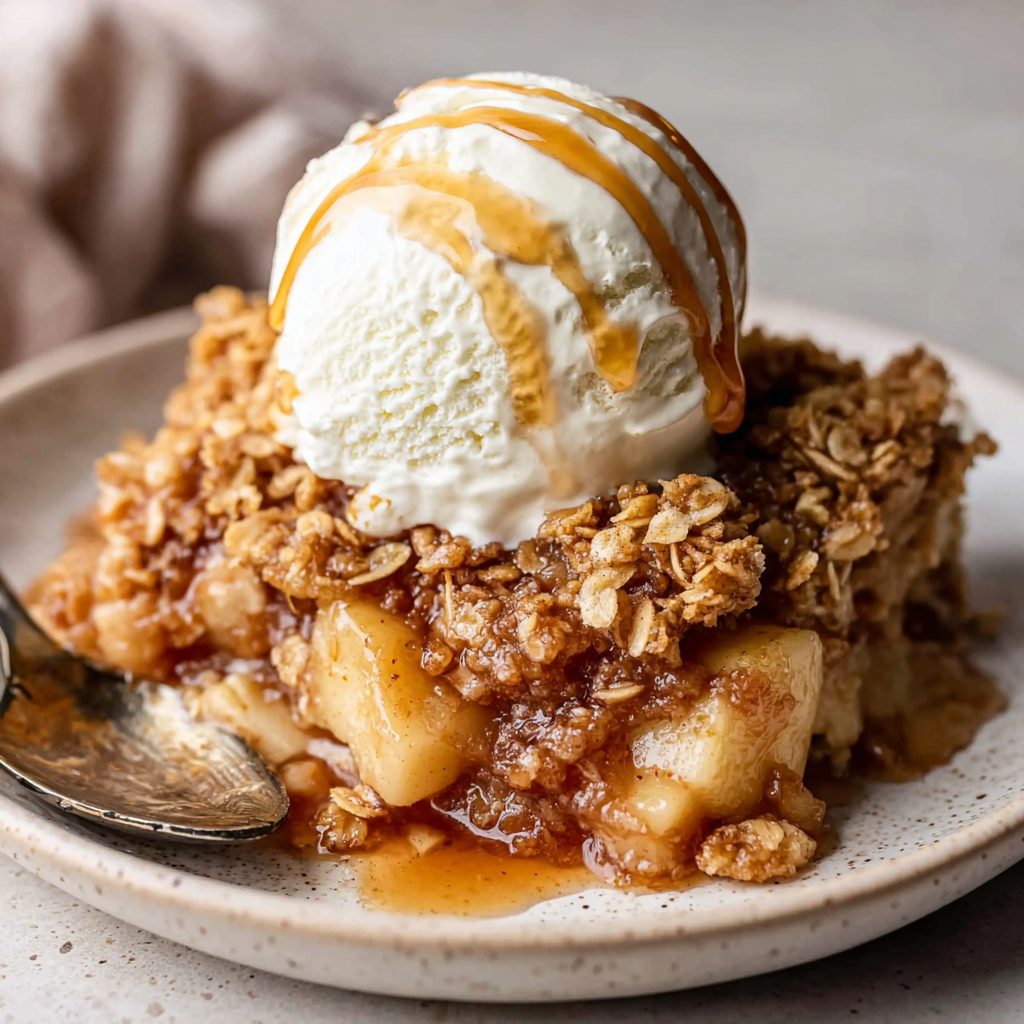
Apple crisp is incredibly versatile, allowing you to use a variety of apples and even mix in other fruits for a unique twist. The gentle sweetness of the apples, combined with the buttery crumble, creates a comforting dish that is best served warm, often accompanied by a scoop of vanilla ice cream or a dollop of whipped cream.
Ingredients
- 8 cups sliced peeled apples (about 6 medium)
Choose a mix of tart and sweet apples like Granny Smith and Honeycrisp for a balanced flavor. The apples soften during baking, releasing juices that blend beautifully with the topping. - 1 cup granulated sugar
Sugar sweetens the apple mixture and helps to create a caramelized texture when baked. Adjust the quantity based on the tartness of your apples. - 1 tablespoon lemon juice
This brightens the overall flavor and prevents the apples from browning too quickly. Lemon juice also adds a pleasant acidity that enhances the sweetness. - 1 teaspoon ground cinnamon
Cinnamon is the classic spice for apple desserts, adding warmth and depth to the dish. It complements the natural sweetness of the apples. - 1 cup rolled oats
Oats create a chewy texture in the topping and help to absorb some of the apple juices during baking. They provide a heartiness that enhances the overall dish. - 1 cup all-purpose flour
Flour acts as a binding agent for the topping, giving it structure. It combines with butter to create a crumbly texture that contrasts the soft apples. - 1/2 cup packed brown sugar
Brown sugar adds a molasses-like depth of flavor to the crisp topping. It also helps to enhance the caramelization process during baking. - 1/2 cup unsalted butter, softened
Butter adds richness and moisture to the topping. When combined with flour and sugar, it creates a crumbly texture that is essential for a great crisp. - 1/4 teaspoon salt
Salt enhances the overall flavor profile, balancing the sweetness of the apples and sugar. It rounds out the dish and helps to highlight other flavors.
Directions & Preparation
Step 1: Preheat your oven to 350°F (175°C).
Preheating the oven is crucial for ensuring even baking. If the oven is not hot enough when you put the apple crisp inside, it can result in a soggy texture instead of a crisp topping.
Step 2: Prepare the apple filling by slicing and peeling the apples.
Peeling the apples helps achieve a smoother texture in the filling. Slice them evenly to ensure they cook uniformly, and toss them with sugar, lemon juice, and cinnamon to enhance their flavor.
Step 3: Place the apple mixture in a 9×13 inch baking dish.
Using a large baking dish ensures that the apples have enough space to expand as they cook. This also allows for a crispy topping that doesn’t steam, avoiding a soggy texture.
Step 4: In a mixing bowl, combine oats, flour, brown sugar, and salt for the topping.
Mixing the dry ingredients together ensures an even distribution of flavors and textures. This creates a cohesive topping that provides crunch on top of the soft apples.
Step 5: Cut the softened butter into the dry mixture until crumbly.
It’s important to incorporate the butter evenly until a crumbly texture forms. This method ensures that the crisp topping bakes up light and flaky instead of dense.
Step 6: Sprinkle the topping evenly over the apple mixture.
An even layer of topping allows for consistent baking and ensures every bite is equally flavorful. This also encourages a delightful golden-brown color.
Step 7: Bake in the preheated oven for 40-45 minutes until apples are tender and topping is golden brown.
Baking at the appropriate temperature allows the flavors to meld and ensures that the topping reaches a wonderful golden color. Check for doneness by inserting a fork into the apples; they should be soft.
Step 8: Let the crisp cool slightly before serving.
Allowing the crisp to rest for about 10-15 minutes allows the juices to thicken slightly. This step makes serving easier and enhances the flavor.
Step 9: Serve warm with ice cream or whipped cream, if desired.
Serving apple crisp warm creates a delightful contrast of temperatures between the hot fruit and cold ice cream. It elevates the experience and makes the dessert even more comforting.

Choosing the Right Apples for Your Crisp
The choice of apples can significantly influence the taste and texture of your apple crisp. Tart varieties like Granny Smith offer a nice contrast to the sweetness of the sugar and topping, while sweeter apples such as Fuji or Gala contribute extra sweetness. A blend of both types ensures a balanced flavor profile, creating a deliciously complex and satisfying dessert.
Enhancing Flavor with Add-Ins
While traditional apple crisp is delicious on its own, adding mixed berries, nuts, or even a dash of vanilla can bring your dessert to the next level. Nuts add crunch and a toasted flavor, while berries can introduce a fresh acidity that complements the apples. Experimenting with these variations can lead to discovering your unique twist on this classic.
Serving Suggestions for a Perfect Finish
For a delightful finish, serve your apple crisp alongside a scoop of vanilla ice cream or a dollop of freshly whipped cream. The cold creaminess contrasts beautifully with the warm, spiced apples and crunchy topping. You could also drizzle caramel sauce over the top for an extra indulgent treat, enhancing both flavor and presentation.
FAQs
What should I do if my topping turns out too dry?
If your topping is too dry, consider adding a little more softened butter or a splash of milk to the mixture. This will help bind the ingredients and create a more cohesive topping.
How can I tell if the apples are properly cooked?
The apples should be tender when pierced with a fork but not mushy. If they are too firm, continue baking for an additional 5-10 minutes.
Is it possible to adjust the sweetness of the crisp?
Absolutely! You can reduce the amount of sugar used or substitute it with a natural sweetener like honey or maple syrup, depending on your preference.
Can I scale this recipe to make a smaller portion?
You can easily halve the ingredients and use a smaller baking dish, like an 8×8 inch pan, to create a intimate portion without compromising flavor.
What should I do if my apple crisp is too watery?
If your apple crisp is too watery, you might have used apples with too high moisture content. To fix this, toss the apples with a bit of cornstarch before baking to help absorb excess liquid.
Can I make a gluten-free version of this apple crisp?
Yes! Substitute all-purpose flour for a gluten-free flour blend or almond flour, and use gluten-free oats to ensure the dish is entirely gluten-free.
Conclusion
Baking an apple crisp is not just about creating a dessert; it’s about making memories and sharing warmth with those you love. Its simple ingredients and comforting flavors harness the essence of home cooking.
Whether enjoyed after a family dinner or shared at a gathering, apple crisp remains a timeless classic that brings joy and comfort. Let each bite remind you of cozy autumn days and the beauty of simple, delicious food.
Recipe Card

Delicious Cheesy Spinach & Artichoke Stuffed Mushrooms
Ingredients
Method
- Preheat your oven to 375°F (190°C).
- Clean the mushrooms and remove stems. Set aside caps, and finely chop stems.
- In a skillet, heat some olive oil over medium heat and sauté the minced garlic until fragrant.
- Add chopped spinach, artichokes, and chopped mushroom stems to the skillet. Cook until spinach wilts.
- In a bowl, combine the sautéed mixture with cream cheese, Parmesan, mozzarella, red pepper flakes, salt, and pepper.
- Fill each mushroom cap generously with the cheese and spinach mixture.
- Place the stuffed mushrooms on a baking sheet and drizzle with olive oil.
- Bake in the preheated oven for 20-25 minutes until the mushrooms are tender and tops are golden.
- Remove from oven and let cool for a few minutes before serving.
Notes
Additional serving suggestions: pair with a crisp salad, garlic bread, or roasted seasonal vegetables for balance.
For make-ahead, prep components separately and assemble just before heating to preserve texture.
Taste and adjust with acid (lemon/vinegar) and salt right at the end to wake up flavors.


