Introduction
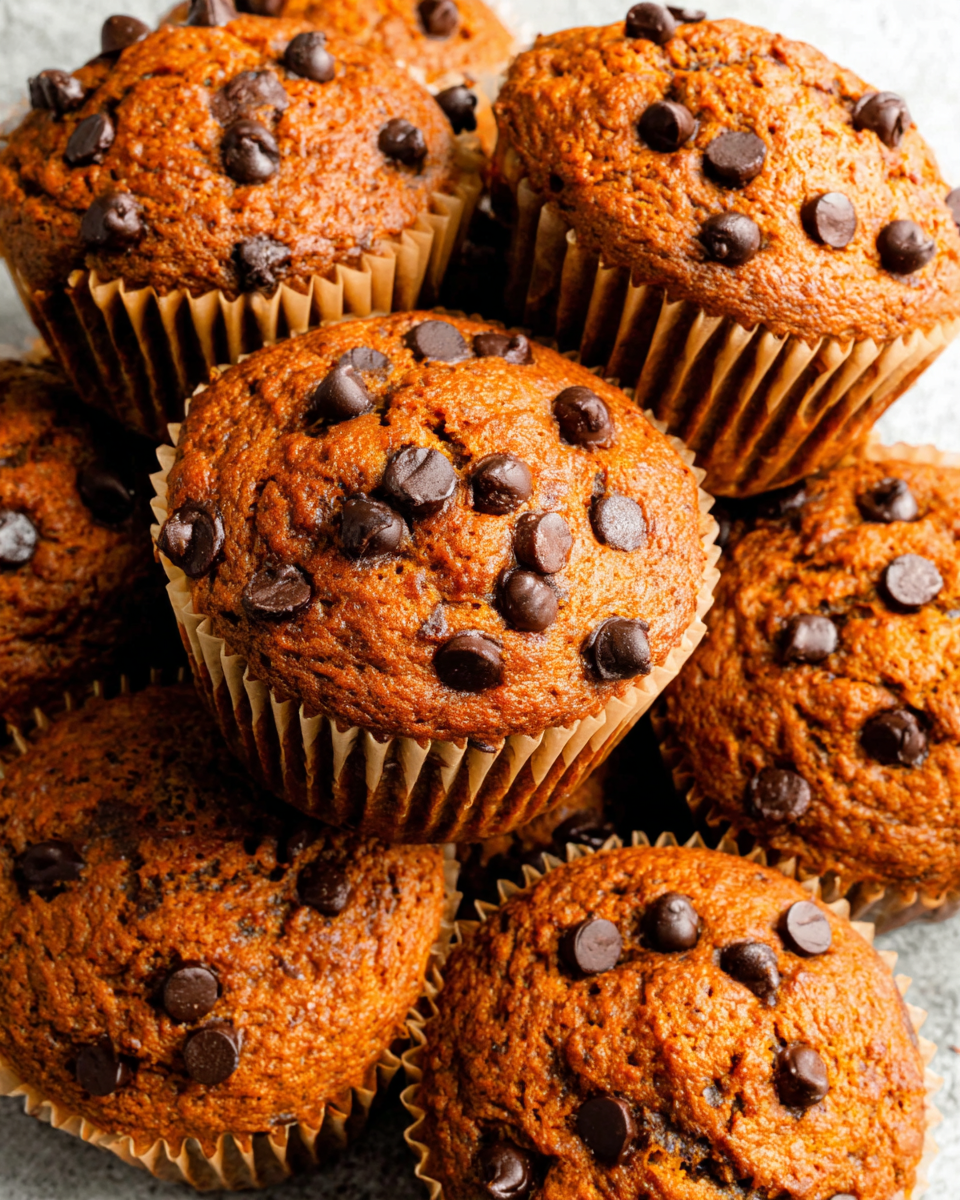
As the leaves begin to change and a crispness fills the air, it's the perfect time to embrace the cozy flavors of fall. There’s something undeniably comforting about the combination of pumpkin and chocolate, and these gluten-free muffins are no exception. They invite warmth and sweetness into your home, making them ideal for breakfast or a delightful snack.
Made with wholesome ingredients, these muffins not only satisfy your craving for something sweet but also cater to dietary needs without compromising flavor. The addition of chocolate chips elevates the classic pumpkin muffin recipe, creating a treat that everyone will love. Let’s dive into the simple yet satisfying process of baking these delightful gluten-free muffins.
Ingredients
- 1 cup pumpkin puree
Pumpkin puree provides moisture and natural sweetness while adding a rich flavor. It's also packed with nutrients such as vitamins A and C. - 1 cup almond flour
Almond flour acts as a gluten-free alternative to traditional flour, contributing to a tender texture and nutty flavor. It's high in protein and healthy fats, making these muffins a nutritious option. - 1/2 cup coconut sugar
Coconut sugar adds a delightful caramel-like sweetness while being less processed than white sugar. It also has a lower glycemic index, making it a slightly healthier choice. - 1/2 tsp baking powder
Baking powder is crucial for helping the muffins rise, leading to a light and fluffy texture. It's a leavening agent that reacts with the moisture and heat in the oven. - 1/2 tsp baking soda
Baking soda, when combined with acid, helps the muffins rise even further. Its role is especially important in gluten-free baking, providing the necessary lift. - 1/2 tsp cinnamon
Cinnamon adds warmth and depth of flavor to the muffins, enhancing the overall taste and providing that comforting fall spice aroma. - 1/4 tsp nutmeg
Nutmeg complements the cinnamon, contributing a subtle warmth that balances the sweetness of the pumpkin and chocolate. - 1/4 tsp salt
Salt enhances the flavors in sweet recipes. It also helps to round out the sweetness and balances the overall flavor profile of the muffins. - 2 large eggs
Eggs serve as a binding agent in the muffins. They provide structure and moisture, contributing to a richer texture and flavor. - 1/2 cup chocolate chips
Chocolate chips add a delightful burst of sweetness and richness, making the muffins truly indulgent. They can be dark, semi-sweet, or dairy-free depending on your preference. - 1/4 cup melted coconut oil
Coconut oil acts as a fat source, ensuring moist muffins. It also infuses a subtle coconut flavor and can help improve the overall texture.
Directions & Preparation
Step 1: Preheat the oven to 350°F (175°C).
Preheating the oven ensures your muffins cook evenly from the start. It’s crucial because if the temperature is too low, they may not rise properly and can become dense.
Step 2: Line a muffin tin with paper liners or grease it.
Using liners or greasing the muffin tin helps prevent sticking, making it easier to remove the muffins once they’re baked. This step ensures a clean presentation and easier cleanup.
Step 3: In a large mixing bowl, combine the pumpkin puree, melted coconut oil, and coconut sugar.
Mixing these ingredients first creates a smooth base for your muffins. The fat from the coconut oil helps dissolve sugar, producing a well-blended mixture that enhances moisture.
Step 4: Add the eggs one at a time, mixing well after each addition.
Adding eggs one at a time allows for better incorporation into the mixture, which ensures that the texture of the muffins remains light and fluffy. This method helps aerate the batter.
Step 5: In a separate bowl, whisk together the almond flour, baking powder, baking soda, spices, and salt.
Whisking the dry ingredients separately helps to evenly distribute the leavening agents and spices. This step is essential for consistent flavor and texture throughout the muffins.
Step 6: Gradually fold the dry mixture into the wet mixture.
Folding preserves the air bubbles created during mixing, which helps keep the muffins light and fluffy. Be careful not to overmix; some lumps are okay.
Step 7: Gently stir in the chocolate chips.
Adding chocolate chips at the end helps ensure they are distributed evenly without breaking apart. This will give you little pockets of chocolate in every bite.
Step 8: Scoop the batter into the prepared muffin tin, filling each cup about 3/4 full.
Filling the cups to the right level allows for proper rising without overflowing. This ensures that the muffins achieve the desired size and shape.
Step 9: Bake in the preheated oven for 18-20 minutes, or until a toothpick comes out clean.
Baking the muffins until set ensures they are cooked through without being dry. A toothpick test is a reliable way to check for doneness; residual moist crumbs indicate they are perfect.
Step 10: Allow the muffins to cool in the tin for 10 minutes before transferring to a wire rack.
Cooling the muffins slightly in the tin makes them easier to remove without falling apart. Transferring them to a wire rack allows for even cooling, which helps maintain their texture.

Perfectly Fluffy Texture Awaits
Achieving a fluffy muffin is about striking the right balance between wet and dry ingredients. The combination of eggs, pumpkin puree, and adequate leavening causes the muffins to rise beautifully. Avoid overmixing the batter, as this can lead to a denser muffin. Allowing the batter to rest briefly before baking also helps improve the texture, giving you a delightful result every time.
Chocolate Chips: A Sweet Surprise
The choice of chocolate chips can significantly influence the flavor profile of these muffins. You can opt for dark chocolate for a richer taste or milk chocolate for creamy sweetness. Consider adding a mix of flavors like white chocolate or butterscotch chips for a creative twist. This unexpected touch elevates the muffins, making them not just tasty but a memorable treat.
Customize to Your Liking
These gluten-free muffins can easily be customized to your taste. Add nuts for extra crunch, or throw in some dried fruit for a burst of flavor. You can also adjust the spices to match your preferences; a hint of ginger or allspice might become your new favorite addition. Don’t hesitate to experiment until you find your perfect mix—baking should be as much about fun as it is about flavor.
FAQs
Why did my muffins turn out too dense?
Dense muffins may result from overmixing the batter, which can develop the structure more than desired. Make sure to mix until just combined.
Can I use a different type of flour for these muffins?
Yes, you can experiment with other gluten-free flours such as oat or rice flour, but results may vary regarding texture and flavor.
What if my chocolate chips sink to the bottom?
To prevent chocolate chips from sinking, you can coat them in a bit of almond flour before folding them into the batter. This gives them a better chance to stay suspended.
How can I adjust the sweetness of the muffins?
Feel free to decrease the coconut sugar for a less sweet batch, or add a touch more if you prefer a sweeter flavor.
Can I replace pumpkin puree with another fruit puree?
Yes, you can substitute banana or applesauce for pumpkin puree. However, this will alter the flavor and texture of the muffins slightly.
Why are my muffins sticky on the outside?
Sticky muffins may signal that they haven’t cooled sufficiently, or the batter may have been too wet. Allow them to cool completely on a wire rack for best results.
Conclusion
Baking gluten-free pumpkin chocolate chip muffins allows you to enjoy the rich flavors of fall while catering to dietary needs. With simple ingredients and straightforward steps, this recipe is perfect for home cooks of all levels.
Whether enjoyed fresh from the oven or stored for later, these muffins promise to bring warmth and joy to your kitchen. So put on your apron, gather your ingredients, and let the cozy baking begin!
Recipe Card
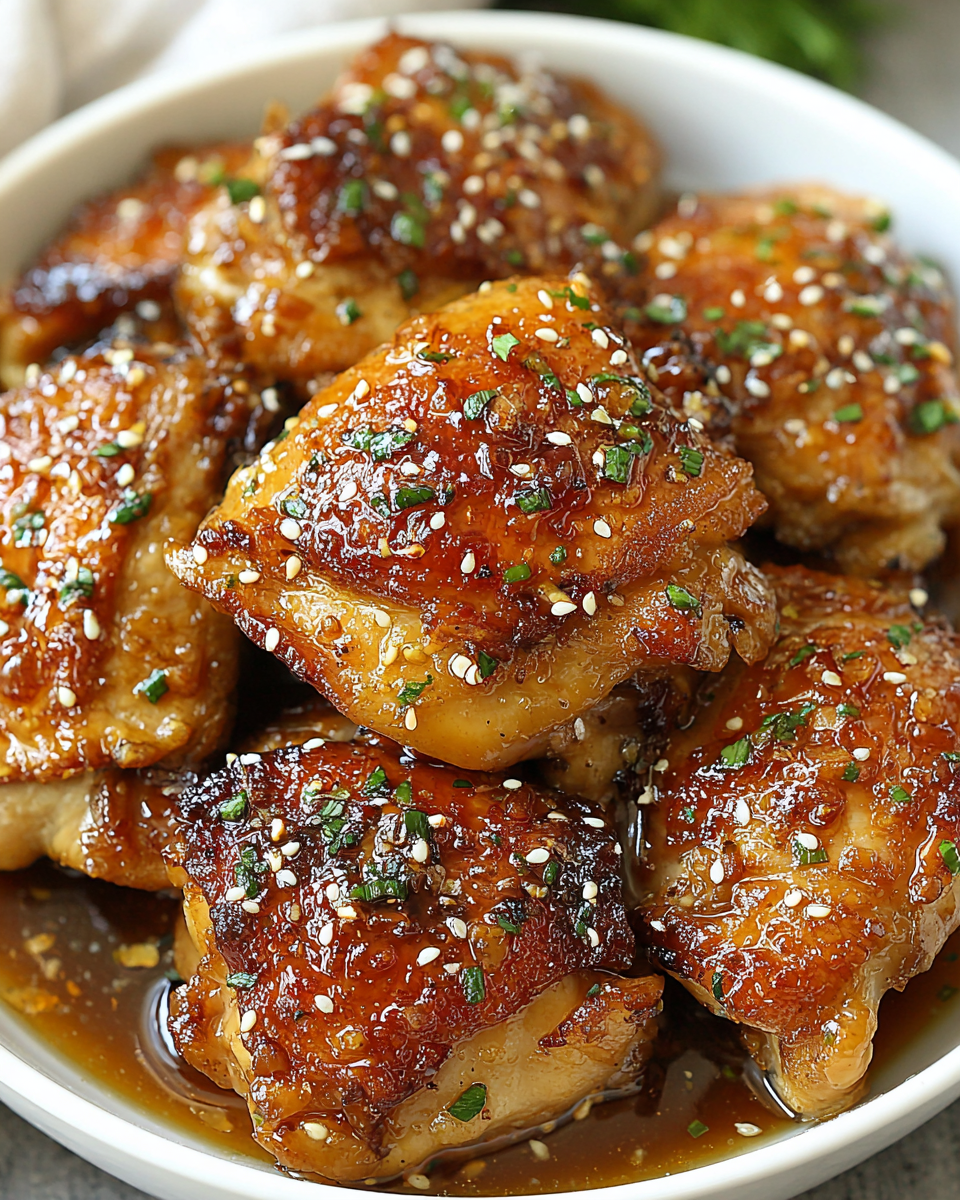
Sweet and Savory Honey Garlic Chicken Thighs Recipe
Ingredients
Method
- Prepare the chicken thighs by patting them dry and seasoning with salt and pepper.
- In a mixing bowl, whisk together honey, soy sauce, minced garlic, apple cider vinegar, black pepper, and sesame oil.
- Place chicken thighs in the slow cooker and pour the sauce over them.
- Set the slow cooker to low and cook for 4-5 hours, or until chicken is tender and fully cooked.
- Once cooked, remove chicken from the slow cooker and let it rest briefly before serving.
- Serve the chicken thighs garnished with sliced green onions and drizzled with additional sauce from the slow cooker.
Notes
Additional serving suggestions: pair with a crisp salad, garlic bread, or roasted seasonal vegetables for balance.
For make-ahead, prep components separately and assemble just before heating to preserve texture.
Taste and adjust with acid (lemon/vinegar) and salt right at the end to wake up flavors.


