Introduction
Peppermint Chocolate Blossom Cookies are a delightful fusion of seasonal flavors that brighten any occasion. Combining rich chocolate and refreshing peppermint creates a delicious treat perfect for celebrations or cozy evenings at home. These cookies not only taste fantastic, but they also provide a lovely presentation.
The unique addition of peppermint adds an unexpected twist to the classic chocolate blossom cookie, making them festive and inviting. As the sweet aroma fills your kitchen, you’ll find them hard to resist, especially warm from the oven. Let’s dive into this delightful recipe that will surely become a favorite.
Ingredients
- 1 cup unsalted butter, softened
Butter adds moisture and richness to the cookies while helping to create a tender texture. The fat in butter enhances the flavor and allows the cookies to spread evenly during baking. - 1 cup granulated sugar
Sugar is essential for sweetness and for creating that coveted cookie texture. It contributes to the cookies' browning due to caramelization, providing a delicious flavor complexity. - 1 cup brown sugar, packed
Brown sugar adds depth of flavor with its molasses content and helps to keep the cookies moist. It also contributes to the chewiness of the final product. - 2 large eggs
Eggs act as a binding agent, providing structure to the cookies. They add moisture and richness, contributing to a soft and chewy texture. - 1 teaspoon vanilla extract
Vanilla enhances the overall flavor profile, rounding out the sweetness of the cookies. It provides an aromatic quality that complements both chocolate and peppermint. - 2 ½ cups all-purpose flour
Flour is the main structure-building ingredient in cookies, giving them shape and body. The right amount ensures the cookies are neither too crumbly nor too dense. - ¾ cup cocoa powder
Cocoa powder infuses the cookies with rich chocolate flavor, and its fat content contributes to a fudgy texture. Choosing high-quality cocoa will elevate the overall taste. - 1 teaspoon baking soda
Baking soda acts as a leavening agent, helping the cookies rise and become light and fluffy. It's important for achieving the right texture in baked goods. - ½ teaspoon salt
Salt enhances flavors, balancing sweetness and complementing the chocolate and peppermint. It’s essential for a well-rounded taste. - 1 teaspoon peppermint extract
This extract imparts a cool, refreshing flavor that translates beautifully through the cookie. Be cautious with the amount; too much can overpower the chocolate. - 1 cup chocolate candies (like Hershey’s Kisses)
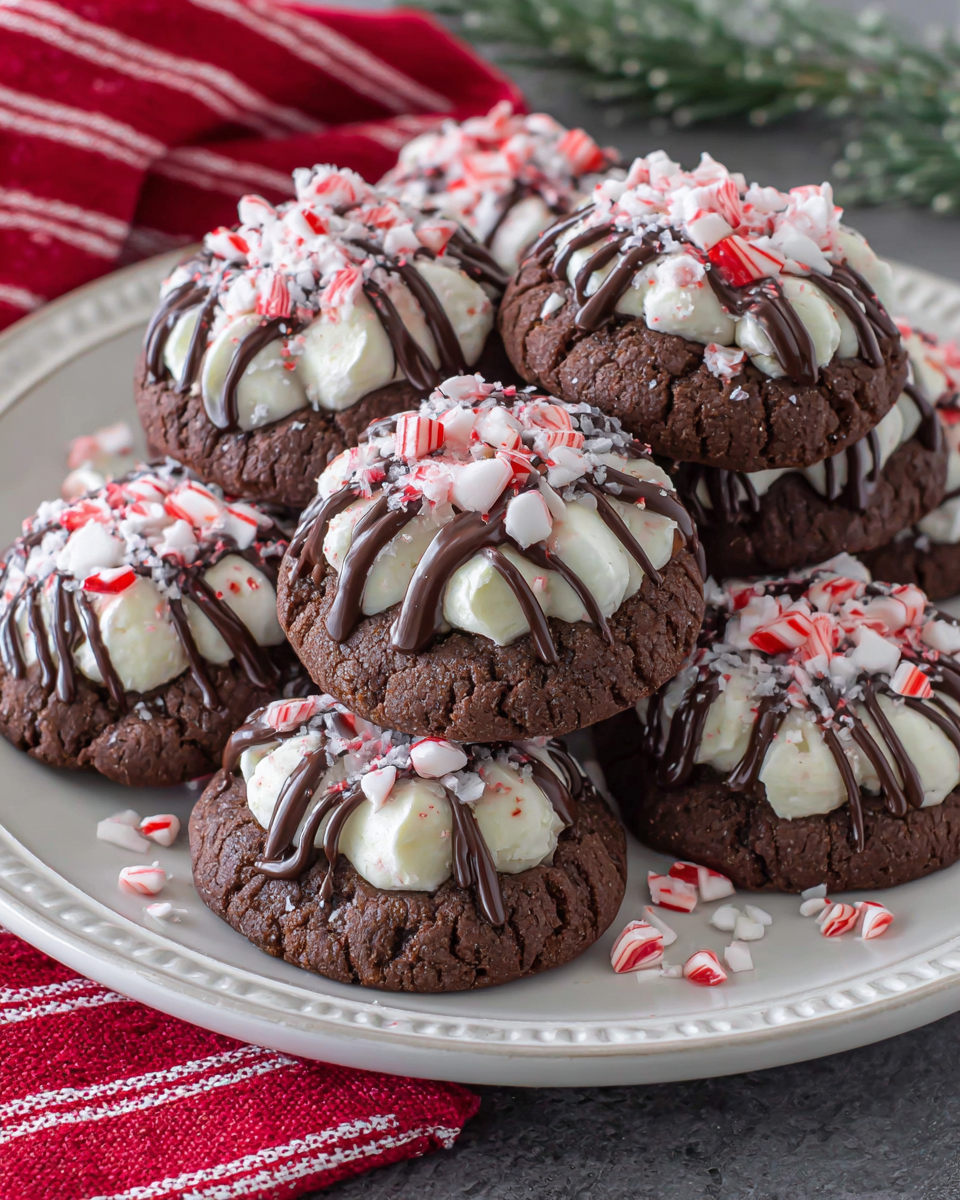
Chocolate candies serve as a delightful finishing touch on each cookie. Once melted slightly, they create a luscious center that enhances chocolate flavor. - Crushed peppermint candies for garnish
Crushed candies provide a festive crunch and additional peppermint flavor. Sprinkling them on top creates a visually appealing and flavorful contrast.
Directions & Preparation
Step 1: Preheat your oven to 350°F (175°C).
Preheating the oven ensures that the cookies bake evenly from the moment they enter. This step is crucial for achieving the desired texture, preventing the cookies from spreading too much, which could result in a flat, overcooked cookie.
Step 2: In a large mixing bowl, cream together the softened butter, granulated sugar, and brown sugar until light and fluffy.
Creaming the butter and sugars incorporates air, which helps the cookies rise. This step is essential for a light texture, as well as ensuring the sugars start to dissolve, contributing to the cookie's overall sweetness.
Step 3: Add the eggs one at a time, mixing well after each addition. Stir in the vanilla extract and peppermint extract.
Incorporating eggs into the creamed mixture adds moisture and binds all ingredients. Mixing well after each egg enhances the emulsion, resulting in a smooth batter that blends flavors efficiently.
Step 4: In another bowl, whisk together the flour, cocoa powder, baking soda, and salt.
Whisking these dry ingredients together ensures they are evenly distributed, which helps create a uniform texture and flavor in the cookies. This step prevents clumping, allowing for consistent rise and chewiness.
Step 5: Gradually add the dry ingredients to the wet mixture, combining until just incorporated.
Mixing the dry ingredients into the wet mixture gradually helps to avoid overworking the dough. Overmixing can develop gluten, leading to tougher cookies, which we want to avoid for the soft and chewy texture.
Step 6: Fold in the chocolate candies, ensuring they are evenly distributed throughout the dough.
Folding in the chocolate candies prevents them from breaking apart and creates delightful pockets of chocolate in every bite. Unevenly distributed candies can lead to some cookies being overly chocolatey while others lack that flavor.
Step 7: Scoop out tablespoons of dough and place them on a lined baking sheet, spacing them about 2 inches apart.
Proper spacing is crucial as cookies will spread while baking. Leaving enough room allows them to rise without merging into one another, ensuring a consistent shape and texture.
Step 8: Bake in the preheated oven for 10-12 minutes, or until the edges are set but the centers are still soft.
Baking until the centers are slightly underdone will keep the cookies chewy. The residual heat will continue to cook them, resulting in perfection, so timing is key to achieving that ideal texture.
Step 9: Remove the cookies from the oven and immediately press a chocolate candy into the center of each cookie.
Pressing chocolate candies onto the warm cookies allows them to melt slightly, creating a soft, gooey center that enhances the cookie's appeal. This step is crucial for that signature chocolate blossom effect.
Step 10: Let the cookies cool on the baking sheet for 5 minutes before transferring them to a wire rack to cool completely.
Cooling on the baking sheet allows cookies to firm up slightly before moving, preventing breakage. Transferring them to a wire rack ensures they don’t steam and maintains the desired texture.
Step 11: Once cooled, sprinkle crushed peppermint candies on top for a festive touch.
Adding crushed peppermint candies before serving introduces a crunchy texture and additional flavor element. This final touch makes the cookies not only taste great but look appealing, perfect for any occasion.

The Perfect Combination of Chocolate and Mint
Chocolate and mint have been a beloved flavor pair for generations, and these cookies embody that classic combination. The rich chocolate provides a deep, satisfying taste, perfectly balanced by the refreshing chill of peppermint. This duo elevates the cookie experience, making each bite exhilarating and indulgent. Whether enjoyed with a cup of cocoa or shared at a gathering, this harmony of flavors captivates everyone.
Making Your Peppermint Chocolate Experience Unique
You can easily customize this recipe to reflect personal tastes or holiday themes. Consider adding crushed nuts or using dark chocolate kisses for a richer flavor. For a more vibrant color, you might use colored sugars or icing to decorate the cookies. These variations can turn your basic peppermint chocolate cookies into a signature dessert that’s truly your own, making every batch unique.
Creating a Festive Atmosphere
Baking peppermint chocolate blossom cookies can become a cherished holiday tradition. The process brings family and friends together, filling the kitchen with delightful aromas that signal joy and celebration. Moreover, decorating the cookies can be a fun activity that inspires creativity among kids and adults alike. Enjoying these cookies while sharing stories and laughter can foster connections and truly embody the spirit of the season.
FAQs
What should I do if my cookies turn out too soft?
If your cookies are too soft, they may need a little more baking time. Ensure they are just set around the edges but still soft in the middle before removing them from the oven. You can also chill the dough for about 30 minutes before baking to firm it up.
Can I substitute an ingredient if I don’t have cocoa powder?
If you lack cocoa powder, you could use a higher amount of melted dark chocolate instead, adjusting the flour slightly to maintain consistency. Keep in mind that this may alter the texture but can yield delicious results.
Why are my cookies flat and spread out?
Flat cookies can result from using melted butter instead of softened butter or overmixing the dough. Ensure to cream the butter properly and avoid excessive mixing after adding the dry ingredients.
Can I use peppermint essential oil instead of extract?
While peppermint essential oil can be used, it is significantly more concentrated. Use sparingly, just a drop or two, to avoid overpowering the cookie flavor.
Can I make these cookies without eggs?
Yes, you can substitute eggs with flaxseed meal or applesauce to achieve a similar binding effect. Using 1/4 cup of unsweetened applesauce per egg will keep the cookies moist.
What if my chocolate candies melt too much?
If the candies melt too excessively during baking, try removing the cookies from the oven sooner. Adjusting the baking time can help preserve their beautiful shape and finish.
Conclusion
Peppermint Chocolate Blossom Cookies are a delightful treat that combines rich flavors and festive charm, making them perfect for holiday gatherings or cozy evenings. This recipe invites you to explore creativity in the kitchen while delivering delicious results.
Whether you enjoy them fresh out of the oven or share them with loved ones, these cookies are sure to brighten any occasion. Happy baking, and enjoy the smiles they bring!
Recipe Card

Delicious Cheesy Spinach & Artichoke Stuffed Mushrooms
Ingredients
Method
- Preheat your oven to 375°F (190°C).
- Clean the mushrooms and remove stems. Set aside caps, and finely chop stems.
- In a skillet, heat some olive oil over medium heat and sauté the minced garlic until fragrant.
- Add chopped spinach, artichokes, and chopped mushroom stems to the skillet. Cook until spinach wilts.
- In a bowl, combine the sautéed mixture with cream cheese, Parmesan, mozzarella, red pepper flakes, salt, and pepper.
- Fill each mushroom cap generously with the cheese and spinach mixture.
- Place the stuffed mushrooms on a baking sheet and drizzle with olive oil.
- Bake in the preheated oven for 20-25 minutes until the mushrooms are tender and tops are golden.
- Remove from oven and let cool for a few minutes before serving.
Notes
Additional serving suggestions: pair with a crisp salad, garlic bread, or roasted seasonal vegetables for balance.
For make-ahead, prep components separately and assemble just before heating to preserve texture.
Taste and adjust with acid (lemon/vinegar) and salt right at the end to wake up flavors.


