
Introduction
The holiday season brings with it the warm scents of cinnamon and nutmeg, but it also serves as the perfect backdrop for indulgent treats. Among these, Christmas Oreo truffles stand out as a festive delight that's easy to make and utterly irresistible. These no-bake confections combine the beloved flavors of Oreos with creamy filling, offering a sweet yet rich bite that everyone will enjoy during holiday gatherings.
With their simple preparation and impressive finish, Oreo truffles can be a fantastic addition to your dessert table or a thoughtful homemade gift. Each truffle is coated in chocolate, adding a luxurious touch that carries the spirit of the season. Embrace the joy of creating these little bites of happiness with your family, and celebrate the tradition of sharing cookies with your loved ones.
Ingredients
- 1 package (15.35 oz) Oreo cookies
Oreo cookies provide the base flavor and texture for these truffles. Their chocolatey goodness combined with the creamy filling adds depth to the truffles, making them satisfyingly rich. - 8 oz cream cheese, softened
Cream cheese acts as a binding agent for the crushed Oreos, creating a smooth and creamy texture. It balances the sweetness, making the truffles rich without being overwhelmingly sweet. - 16 oz chocolate (dark or white), for coating
The chocolate coating not only adds a luscious exterior but also enhances the flavor profile of each truffle. Dark chocolate will give a more intense taste, while white chocolate offers a sweeter contrast. - Optional: sprinkles or crushed candy canes
These toppings not only enhance the visual appeal but also add an extra layer of texture and flavor that can elevate your truffles. They bring a festive touch, perfect for holiday celebrations.
Directions & Preparation
Step 1: Crush the Oreo cookies.
Start by placing the Oreo cookies into a food processor and pulse until they are finely crushed. This step is vital as it creates the foundation for the truffle mixture. A fine consistency ensures that every bite is smooth and chocolatey without any large cookie chunks. If you don't have a food processor, you can use a zip-top bag and a rolling pin to crush the cookies.
Step 2: Mix cream cheese into crushed Oreos.
In a mixing bowl, combine the crushed Oreos with softened cream cheese. Use a spatula or mixer to blend until fully incorporated, creating a dough-like mixture. This step is crucial because it marries the flavors of the cookies with the cream cheese, ensuring each truffle has a consistent taste and texture. Let the mixture rest for a few minutes so it firms up slightly for easy handling.
Step 3: Chill the mixture.
Cover the bowl with plastic wrap and refrigerate for about 30 minutes. This chilling step helps the mixture firm up, making it easier to scoop and shape into truffle balls. If the mixture is too soft, your truffles might not hold their shape after coating. This time in the fridge is essential for achieving a perfect consistency.
Step 4: Shape the truffles.
Using a cookie scoop or your hands, portion the chilled mixture into small balls, about 1 inch in diameter. Uniform sizes will ensure even coating and consistent serving. Work quickly as the warmth of your hands can soften the mixture. Once shaped, place them on a parchment-lined baking sheet to set before coating.
Step 5: Coat with chocolate.
Melt the chocolate using a microwave or double boiler until smooth. Dip each truffle into the chocolate, ensuring it’s fully coated. You can use a fork for easy handling. The chocolate coating not only enhances flavor but also helps seal in the cream filling, creating a delicious contrast to the crunchy exterior. Place the coated truffles back onto the baking sheet.
Step 6: Add toppings and chill.
While the chocolate is still warm, sprinkle your desired toppings like crushed candy canes or festive sprinkles. This adds both crunch and visual appeal, making your truffles perfect for holiday gatherings. After decorating, return the truffles to the refrigerator to let the chocolate harden completely, which usually takes about 30 minutes.
Step 7: Serve and enjoy.
Once the chocolate has firmed up, your delicious Christmas Oreo truffles are ready to be enjoyed. Arrange them on a platter or in decorative boxes for gifting. Their delightful flavor and festive appearance make them a perfect treat for sharing with friends and family during this joyful season.

Customize Your Chocolate
Choosing the right chocolate for your coating can significantly alter the flavor of your truffles. Dark chocolate provides a rich, bittersweet contrast to the sweetness of the cream cheese and Oreos, while milk chocolate offers a classic sweetness. For those who enjoy a creamier treat, white chocolate adds a smooth and sweet finish. You can also experiment with flavored chocolate like mint or orange to add a festive twist.
Incorporate Holiday Flavors
To truly embrace the spirit of the season, consider incorporating holiday spices into your truffles. A dusting of cinnamon or a hint of nutmeg mixed into the Oreo and cream cheese base can bring warmth and a lovely holiday aroma. You can even infuse some peppermint extract for a minty kick that wonderfully complements the chocolate coating.
Presentation is Key
The way you present your Christmas Oreo truffles can elevate the experience of enjoying them. Use decorative boxes, cellophane wrap, or festive tins to package them beautifully for gifting. Garnish them with a sprig of holly or a cinnamon stick for a charming touch. When serving at a party, arrange them on a tiered platter to create an eye-catching display that will draw guests in.
FAQs
What can I do if my truffle mixture is too soft?
If your mixture is too soft to shape, return it to the refrigerator for additional chilling time. The cream cheese can sometimes make it too gooey, and extra time in the fridge helps firm it up for easy handling.
Can I make these truffles without cream cheese?
While cream cheese is essential for texture and flavor, you can substitute it with mascarpone cheese for a different taste. However, keep in mind that textures might vary slightly.
What if my chocolate coating is too thick?
If your melted chocolate appears too thick, add a small amount of vegetable oil or shortening to thin it out. This will help achieve a smoother coating when dipping the truffles.
How can I adapt these truffles for nut allergies?
To make these truffles nut-free, ensure you select chocolate that is explicitly labeled as nut-free. Avoid any toppings that may contain nuts and check that your Oreos do not mention potential cross-contamination.
What flavor combinations work well with Oreo truffles?
Oreo truffles are extremely versatile, and you can mix in flavors like peanut butter, mint, or even raspberry for a fruity twist. Adding a flavored extract can transform the taste profile without much extra effort.
Can I scale this recipe for a larger crowd?
Absolutely! This recipe can easily be doubled or tripled. Simply multiply the ingredients accordingly, keeping in mind that chilling times may slightly vary with larger batches.
What if the chocolate coating won’t stick to the truffles?
If you find the chocolate isn’t adhering well, ensure your truffles are chilled well, and the chocolate is at the right consistency. Warm chocolate coating helps it stick better to the truffles.
Conclusion
Making Christmas Oreo truffles is not just about creating a delicious treat; it's about the joy of sharing and indulging during the holidays. Whether enjoyed at family gatherings or given as thoughtful gifts, these truffles embody the spirit of the season.
Embrace the creativity that comes with decorating and customizing your truffles, making each batch unique to your taste. This festive treat is sure to become a cherished tradition in your holiday celebrations.
Recipe Card
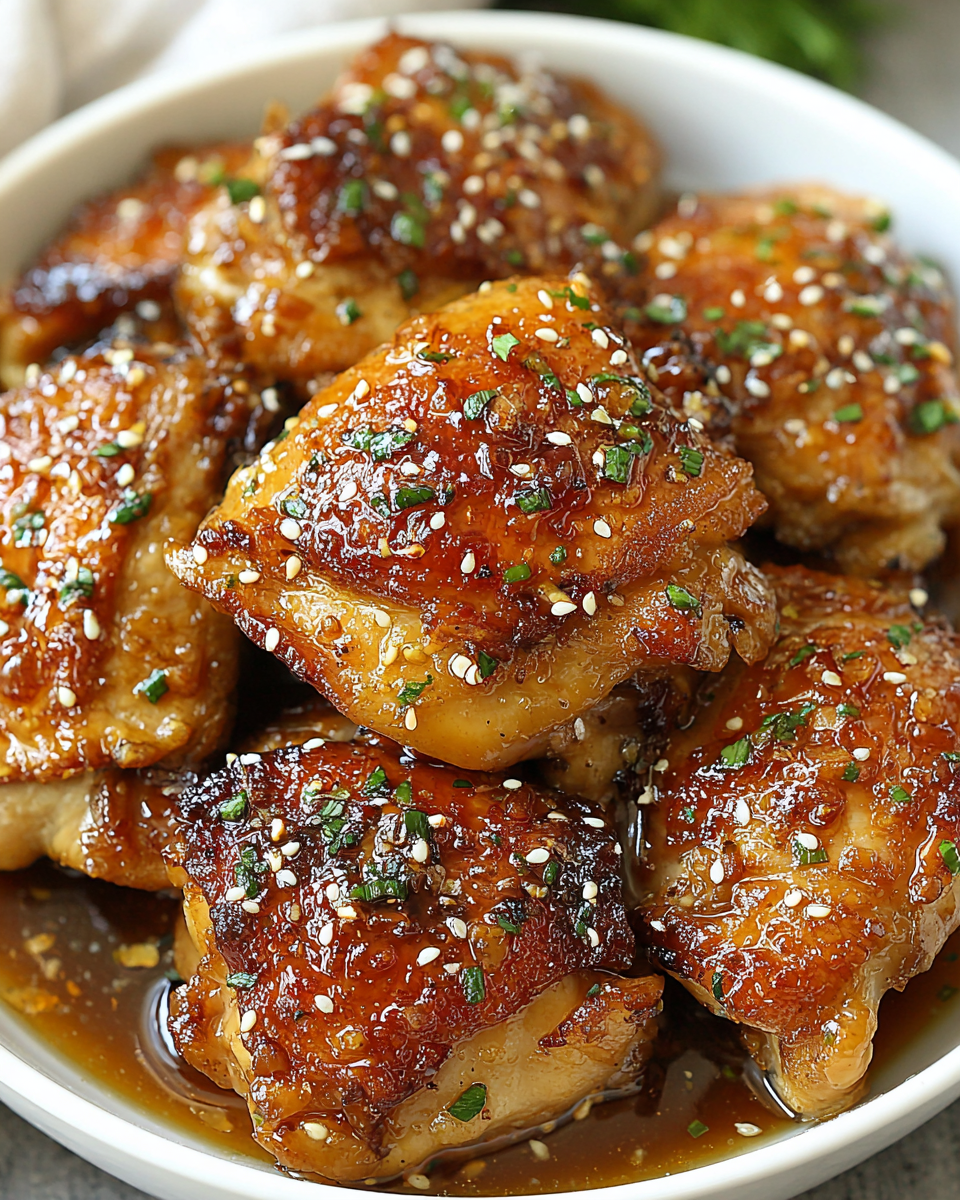
Sweet and Savory Honey Garlic Chicken Thighs Recipe
Ingredients
Method
- Prepare the chicken thighs by patting them dry and seasoning with salt and pepper.
- In a mixing bowl, whisk together honey, soy sauce, minced garlic, apple cider vinegar, black pepper, and sesame oil.
- Place chicken thighs in the slow cooker and pour the sauce over them.
- Set the slow cooker to low and cook for 4-5 hours, or until chicken is tender and fully cooked.
- Once cooked, remove chicken from the slow cooker and let it rest briefly before serving.
- Serve the chicken thighs garnished with sliced green onions and drizzled with additional sauce from the slow cooker.
Notes
Additional serving suggestions: pair with a crisp salad, garlic bread, or roasted seasonal vegetables for balance.
For make-ahead, prep components separately and assemble just before heating to preserve texture.
Taste and adjust with acid (lemon/vinegar) and salt right at the end to wake up flavors.


