Introduction
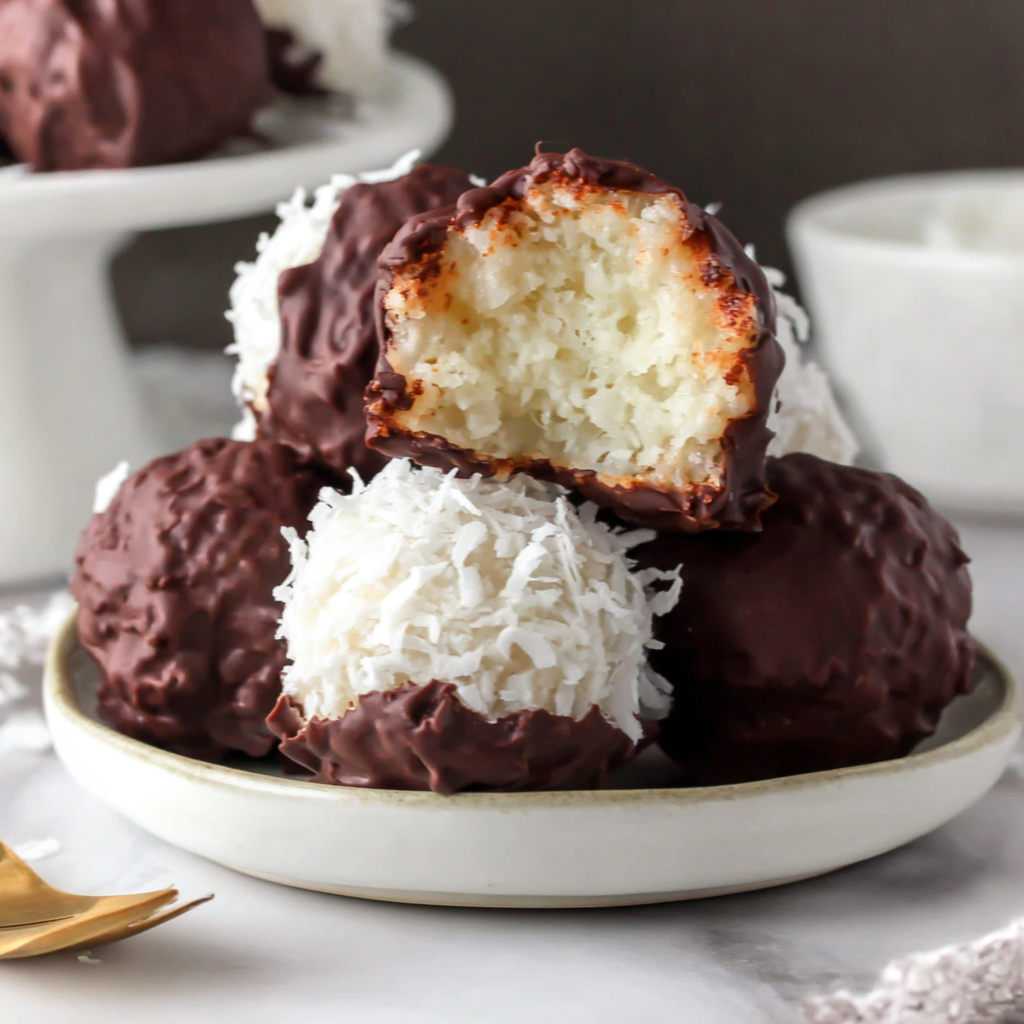
Coconut balls with chocolate coating are a delicious treat that brings a taste of the tropical paradise to your kitchen. These little bites of bliss combine the rich creaminess of coconut with the indulgence of chocolate, making them perfect for any occasion.
Simple yet elegant, they are incredibly easy to make and don’t require any baking. The contrast of the chewy coconut texture against the smooth, decadent chocolate creates a delightful mouthfeel that can satisfy any sweet tooth.
Whether you're hosting guests or simply treating yourself, these coconut balls are sure to impress with their beautiful presentation and delicious taste.
Ingredients
- 2 cups shredded coconut
Shredded coconut serves as the main ingredient, providing texture and a rich coconut flavor. It also contributes to the chewy consistency that characterizes these treats. - 1 cup sweetened condensed milk
Sweetened condensed milk adds sweetness and moisture, binding the shredded coconut into a cohesive mixture. It also enriches the flavor, resulting in a more indulgent treat. - 1 teaspoon vanilla extract
Vanilla extract enhances the overall flavor, adding a touch of warmth and complexity. It complements the sweet and creamy elements, rounding out the taste profile. - 8 ounces dark chocolate
Dark chocolate serves as the luscious coating, providing a rich and slightly bitter contrast to the sweetness of the coconut mixture. It solidifies as it cools, adding a delightful crunch. - 1 tablespoon coconut oil
Coconut oil is used to thin the melted chocolate, making it easier to coat the coconut balls evenly. It also contributes a subtle coconut flavor and helps achieve a smooth texture.
Directions & Preparation
Step 1: Prepare the coconut mixture by combining shredded coconut, sweetened condensed milk, and vanilla extract in a bowl.
This step is crucial as it brings together the primary ingredients. Mix them well until the shredded coconut is fully coated in the milk and vanilla, ensuring every bite delivers a soft, sweet experience. The mixture should appear sticky and slightly clumpy.
Step 2: Form the mixture into small balls and place them on a parchment-lined baking sheet.
Shaping the coconut mixture into balls is where you create the treat's iconic form. Use your hands to roll about a tablespoon of the mixture into a ball. Place them on the baking sheet so they don’t touch, as they may stick together. Chilling these balls will help them firm up before the chocolate coating.
Step 3: Chill the formed balls in the refrigerator for at least 30 minutes to firm up.
Chilling is an essential step that helps the coconut balls hold their shape during the chocolate coating process. If they’re too soft, it may be challenging to coat them evenly. The refrigeration time also allows the flavors to meld together, enhancing the taste.
Step 4: Melt the dark chocolate and coconut oil together in a microwave or double boiler until smooth.
Melting the chocolate correctly is vital; it should be smooth and glossy for the best coating. The coconut oil will help adjust the consistency. Stir gently to avoid air bubbles, and ensure you don’t overheat, as it can make the chocolate seize up, leading to a lumpy coating.
Step 5: Dip each coconut ball into the melted chocolate, coating completely, and return to the baking sheet.
The dipping process is where the magic truly happens. Use a fork or toothpick to dip each ball into the chocolate, ensuring an even coat. Let any excess chocolate drip away. This step not only adds a delicious layer but also transforms the appearance into a glossy, enticing treat.
Step 6: Refrigerate the coated coconut balls again until the chocolate hardens.
After coating, it’s important to chill the coconut balls again so the chocolate can set and harden. This creates a beautiful shell around the coconut filling. The chilling time may vary depending on the thickness of the chocolate coating; ensure they're fully set before serving.
Step 7: Serve chilled and enjoy your delightful coconut chocolate treats!
Serving the coconut balls chilled enhances their texture and flavor. The chocolate should have a satisfying snap when bitten into while the coconut remains chewy. They make for a perfect dessert for any gathering or a sweet treat to enjoy at home.

Creative Variations for Coconut Lovers
Though the classic coconut balls with chocolate coating are irresistible on their own, you can add unique spins to this recipe. Consider incorporating ingredients like crushed nuts, dried fruits, or spices such as cinnamon or nutmeg into the coconut mixture to create new flavor profiles. You can also experiment with different types of chocolate—white chocolate for a sweeter finish or milk chocolate for a milkier, creamier bite.
Presentation Tips for an Elegant Treat
Transform these simple coconut balls into a fancy dessert by focusing on presentation. Consider rolling them in additional shredded coconut, crushed nuts, or cocoa powder before the chocolate hardens for an aesthetic appeal. You can also serve them in elegant paper cups on a decorative platter, maybe dusting them with a little sea salt or drizzling with contrasting chocolate to enhance their visual allure.
The Sweet Science Behind Coconut Balls
Understanding the balance of ingredients can enhance your coconut balls' quality. The ratio of coconut to condensed milk is key—too much coconut may yield a dry mixture, while too little can make them soggy. By adhering to the ingredient ratios and ensuring they meld together well, you’ll achieve that perfect chewy texture and rich flavor that defines a great coconut ball.
FAQs
What chocolate can I use for coating?
You can use dark, milk, or white chocolate based on your taste preference. Dark chocolate gives a rich contrast, while milk chocolate offers a sweeter profile.
Why are my coconut balls too dry?
If your coconut balls are dry, it may be due to more coconut than condensed milk. Adjust the ratio next time, ensuring you have enough moisture to bind the mixture.
Can I use unsweetened coconut in this recipe?
Yes, you can, but then you may need to increase the amount of sweetened condensed milk to achieve the desired sweetness.
What should I do if the chocolate coating is too thick?
If the chocolate is too thick, reheat it with a little more coconut oil or milk to achieve a smoother consistency for easier dipping.
Can I flavor the chocolate coating?
Absolutely! Adding a few drops of peppermint or orange extract can create a delightful twist to your chocolate coating.
Why did my coconut balls fall apart?
If they fall apart, they might not have been chilled enough before assembly. Ensure they are sufficiently firm before coating.
Conclusion
Making coconut balls with chocolate coating is a delightful and rewarding experience. With just a few basic ingredients and some straightforward steps, you can create an impressive homemade treat that tastes far more luxurious than it is to prepare.
Experiment with flavors and presentations to truly make them your own. Whether enjoyed on special occasions or simply as an everyday treat, these coconut balls are sure to bring smiles all around.
Recipe Card

Irresistible Andes Mint Mini Cheesecakes You Can Make
Ingredients
Method
- Preheat your oven to 325°F (160°C).
- Prepare the crust by combining crushed graham crackers and melted butter.
- Press the graham cracker mixture into the bottom of a muffin pan.
- In a mixing bowl, beat the softened cream cheese until smooth.
- Add sugar and vanilla extract, mixing until incorporated.
- Add the eggs one at a time, incorporating fully after each addition.
- Stir in sour cream and Andes mint chips until evenly distributed.
- Spoon the filling into the prepared crusts, filling each cup about 3/4 full.
- Bake in the preheated oven for 18–20 minutes, or until the centers are just set.
- Allow the cheesecakes to cool at room temperature, then chill in the refrigerator for at least 2 hours.
- Whip heavy cream until soft peaks form and top each mini cheesecake with a dollop.
- Garnish with additional Andes mint chips if desired.
Notes
Additional serving suggestions: pair with a crisp salad, garlic bread, or roasted seasonal vegetables for balance.
For make-ahead, prep components separately and assemble just before heating to preserve texture.
Taste and adjust with acid (lemon/vinegar) and salt right at the end to wake up flavors.


