
Introduction
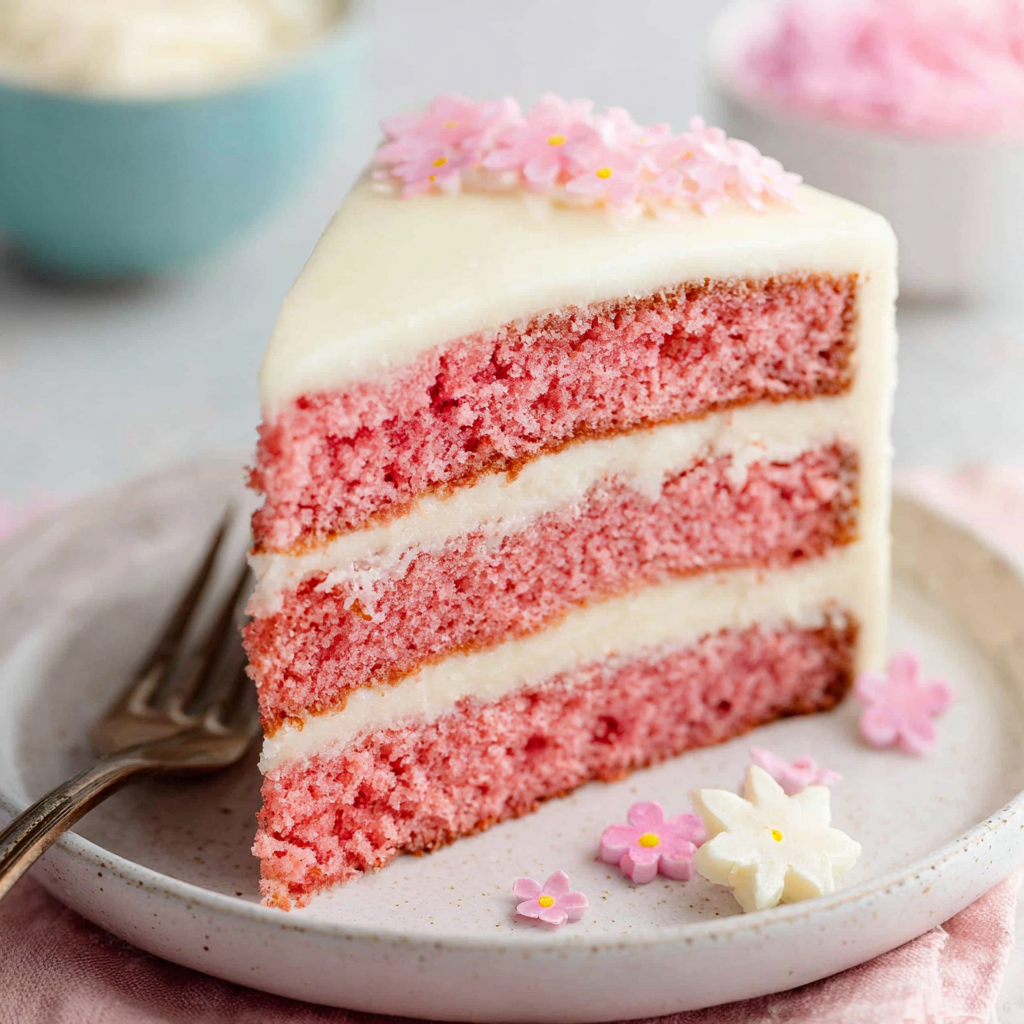
Pink Velvet Cake is a whimsical twist on the classic red velvet, perfect for celebrations or simply to impress guests. The lively pink hue not only makes it visually stunning but also provides a deliciously unique flavor profile that combines rich cocoa with a hint of vanilla.
This cake features a tender crumb and a smooth cream cheese frosting that enhances its overall charm. Whether for a birthday, a bridal shower, or a really sweet Tuesday, this cake promises to bring joy to any occasion.
Ingredients
- 2 ½ cups all-purpose flour
This provides the structure and stability for the cake. The right flour will give the cake a soft crumb, crucial for achieving that classic velvet texture. - 1 ½ cups granulated sugar
Sugar not only sweetens the cake but also helps with moisture retention, contributing to a soft and tender texture. - 1 cup unsalted butter, softened
Butter adds richness and flavor while also helping to create a fine crumb by trapping air during creaming. - 1 cup buttermilk, at room temperature
Buttermilk adds acidity, which reacts with the baking soda to create a moist cake and also instills a slight tanginess that balances the sweetness. - 3 large eggs, at room temperature
Eggs are crucial for binding the ingredients together, and when at room temperature, they incorporate better into the batter. - 2 tablespoons red food coloring
This is the defining ingredient for the cake's signature color, giving it that iconic pink hue without overpowering the flavor. - 1 tablespoon vanilla extract
Vanilla extract enhances the overall flavor profile, providing warmth and depth to the cake. - 1 tablespoon baking powder
This leavening agent helps the cake rise, resulting in a light and fluffy texture. - 1 teaspoon baking soda
Baking soda works in conjunction with the buttermilk's acidity to create lift in the cake. - ½ teaspoon salt
Salt enhances the flavors of the other ingredients and balances the sweetness. - 8 oz cream cheese, softened
Used for frosting, cream cheese adds a tangy richness that complements the sweetness of the cake. - 4 cups powdered sugar
Powdered sugar is essential for the frosting's sweetness and provides a smooth consistency. - ½ cup unsalted butter, softened
The butter in the frosting contributes to its creamy texture and rich flavor.
Directions & Preparation
Step 1: Prepare the cake pans by greasing and lining them with parchment paper.
Properly preparing the cake pans ensures that your layers release smoothly after baking. Greasing prevents sticking, while the parchment paper provides an extra barrier, making it easy to lift the cakes out intact.
Step 2: Preheat the oven to 350°F (175°C).
Preheating the oven is critical for even cooking. If the oven isn't heated adequately, the cake may rise unevenly or develop a dense, rubbery texture, impacting the cake's light and fluffy quality.
Step 3: In a large mixing bowl, cream together the softened butter and granulated sugar until light and fluffy.
This step is key for creating a light cake. Creaming incorporates air into the butter, aiding in the leavening process. Aim for a pale, fluffy mixture, which indicates sufficient air has been incorporated.
Step 4: Add the eggs one at a time, mixing well after each addition. Then, mix in the vanilla extract.
Incorporating eggs individually helps them to emulsify into the mixture properly, ensuring a stable batter. Adding vanilla enhances the flavor and rounds out the sweetness of the cake.
Step 5: Mix in the food coloring until fully combined.
This is where the cake starts to take shape visually. Ensure the food coloring is evenly blended into the batter for consistent color throughout the cake. Adjust the amount based on your desired pink hue.
Step 6: In a separate bowl, whisk together the flour, baking powder, baking soda, and salt.
Whisking the dry ingredients together helps to evenly distribute the leavening agents and prevents clumps of baking powder or baking soda in your batter, leading to an even rise.
Step 7: Gradually add the dry ingredients to the butter mixture, alternating with the buttermilk. Start and end with the flour mixture.
Alternating the dry and wet ingredients helps to incorporate them without overmixing. Overmixing can lead to a tough cake texture. Be gentle and mix until just combined for best results.
Step 8: Pour the batter evenly into the prepared pans and smooth the tops.
Lifting the batter helps to create even layers, ensuring your cake has a nice rise. Smoothing the tops helps to prevent domes from forming, resulting in flat, even layers for stacking.
Step 9: Bake in the preheated oven for 25-30 minutes, or until a toothpick inserted into the center comes out clean.
Baking time can vary based on your oven and pan sizes; checking for doneness with a toothpick is essential. It keeps the cake from becoming overbaked and dry, allowing it to retain moisture.
Step 10: Allow the cakes to cool in the pans for 10 minutes before transferring to wire racks.
Cooling the cakes in the pan helps them to set slightly, making them easier to remove. Transferring them to wire racks allows for even cooling, preventing a soggy bottom.
Step 11: While the cake layers cool, prepare the cream cheese frosting by beating together the cream cheese and softened butter until smooth.
Properly creaming the frosting ingredients allows for a creamy, lump-free texture. This combination forms the base of the frosting, which will balance the sweetness of the cake.
Step 12: Gradually add the powdered sugar until the frosting reaches your desired sweetness and consistency.
Adding powdered sugar gradually prevents sugar clouds and allows you to judge the frosting's texture. You can make it stiffer or thinner by adjusting the sugar amount, suited to how you intend to spread it.
Step 13: Once the cake layers are completely cool, place one layer on a serving plate and spread a layer of frosting on top.
Layering the frosting between cakes creates a delightful surprise with every slice. Ensuring the cakes are completely cooled prevents the frosting from melting, maintaining its structure and flavor.
Step 14: Add the second layer and frost the top and sides of the cake.
Frosting the sides can create a beautifully finished appearance. Use a spatula to create a smooth surface, allowing the vibrant pink layers to shine through in every slice.
Step 15: Decorate as desired and serve.
This last step gives you creative freedom to add your personal touch. Whether you opt for fresh flowers, sprinkles, or elegant piping, personalizing your cake enhances its visual appeal.

Elevating Flavor with Vanilla
In Pink Velvet Cake, vanilla plays a silent yet impactful role. It enriches the cake’s flavor profile, balancing the sweetness and cocoa notes. Using quality pure vanilla extract can elevate the taste considerably, making every bite more enjoyable.
The Science of Color
The iconic pink color in Pink Velvet Cake is not simply for aesthetics; it impacts appetite and perception of flavor. Bright colors can entice eaters, leading to a more enjoyable experience and making it ideal for celebratory occasions.
Frosting: The Finishing Touch
The frosting on Pink Velvet Cake is more than a sweet topping; it brings creaminess and contrast. Cream cheese frosting is especially favored for its tartness, which complements the sweet cake, enhancing every mouthful while providing a luscious finish.
FAQs
What should I do if my cake layers crack on top?
If your cake layers crack, it often means the oven temperature was too hot. Next time, consider lowering the temperature by 25°F and ensure the layers bake evenly.
What happens if my batter is too thick?
If your batter seems too thick, try adding a tablespoon or two of milk or buttermilk at a time. This adjustment helps achieve the right consistency for a fluffy texture.
Can this cake be made into cupcakes?
Yes, you can use this batter to make cupcakes! Fill each cupcake liner 2/3 full and bake them at 350°F for about 18-20 minutes.
How can I make my frosting less sweet?
To balance out the sweetness of your cream cheese frosting, consider adding a pinch of salt or a tablespoon of sour cream for a tangy note.
What if I want my cake to be a deeper pink?
For a deeper pink color, simply increase the amount of food coloring gradually until you reach your desired shade, ensuring not to overpower the flavor.
How can I adjust the recipe for a larger cake?
To scale up the recipe, simply multiply the ingredient amounts based on the desired cake size. Adjust cooking time as necessary if using larger pans.
Conclusion
Making Pink Velvet Cake is not just about the ingredients; it's about creating joyful moments. Each layer, each slice, is an expression of sweetness that can brighten any gathering.
So whether you’re baking for a special occasion or treating yourself on a quiet day, this delightful cake is bound to inspire smiles and add a pop of color to your table.
Recipe Card
Delightful Pink Velvet Cake for Celebrations
Ingredients
Method
- Prepare the cake pans by greasing and lining them with parchment paper.
- Preheat the oven to 350°F (175°C).
- In a large mixing bowl, cream together the softened butter and granulated sugar until light and fluffy.
- Add the eggs one at a time, mixing well after each addition. Then, mix in the vanilla extract.
- Mix in the food coloring until fully combined.
- In a separate bowl, whisk together the flour, baking powder, baking soda, and salt.
- Gradually add the dry ingredients to the butter mixture, alternating with the buttermilk. Start and end with the flour mixture.
- Pour the batter evenly into the prepared pans and smooth the tops.
- Bake in the preheated oven for 25-30 minutes, or until a toothpick inserted into the center comes out clean.
- Allow the cakes to cool in the pans for 10 minutes before transferring to wire racks.
- While the cake layers cool, prepare the cream cheese frosting by beating together the cream cheese and softened butter until smooth.
- Gradually add the powdered sugar until the frosting reaches your desired sweetness and consistency.
- Once the cake layers are completely cool, place one layer on a serving plate and spread a layer of frosting on top.
- Add the second layer and frost the top and sides of the cake.
- Decorate as desired and serve.
Notes
Additional serving suggestions: pair with a crisp salad, garlic bread, or roasted seasonal vegetables for balance.
For make-ahead, prep components separately and assemble just before heating to preserve texture.
Taste and adjust with acid (lemon/vinegar) and salt right at the end to wake up flavors.


