Introduction
Sushi has become a household favorite, but the intricate rolling process can often be intimidating for home cooks. Enter the spicy salmon sushi bake, a deconstructed version of the classic dish that combines all the vibrant flavors in a simple, yet impressive, casserole form. This recipe is perfect for busy weeknights when you crave the taste of sushi without the fuss.
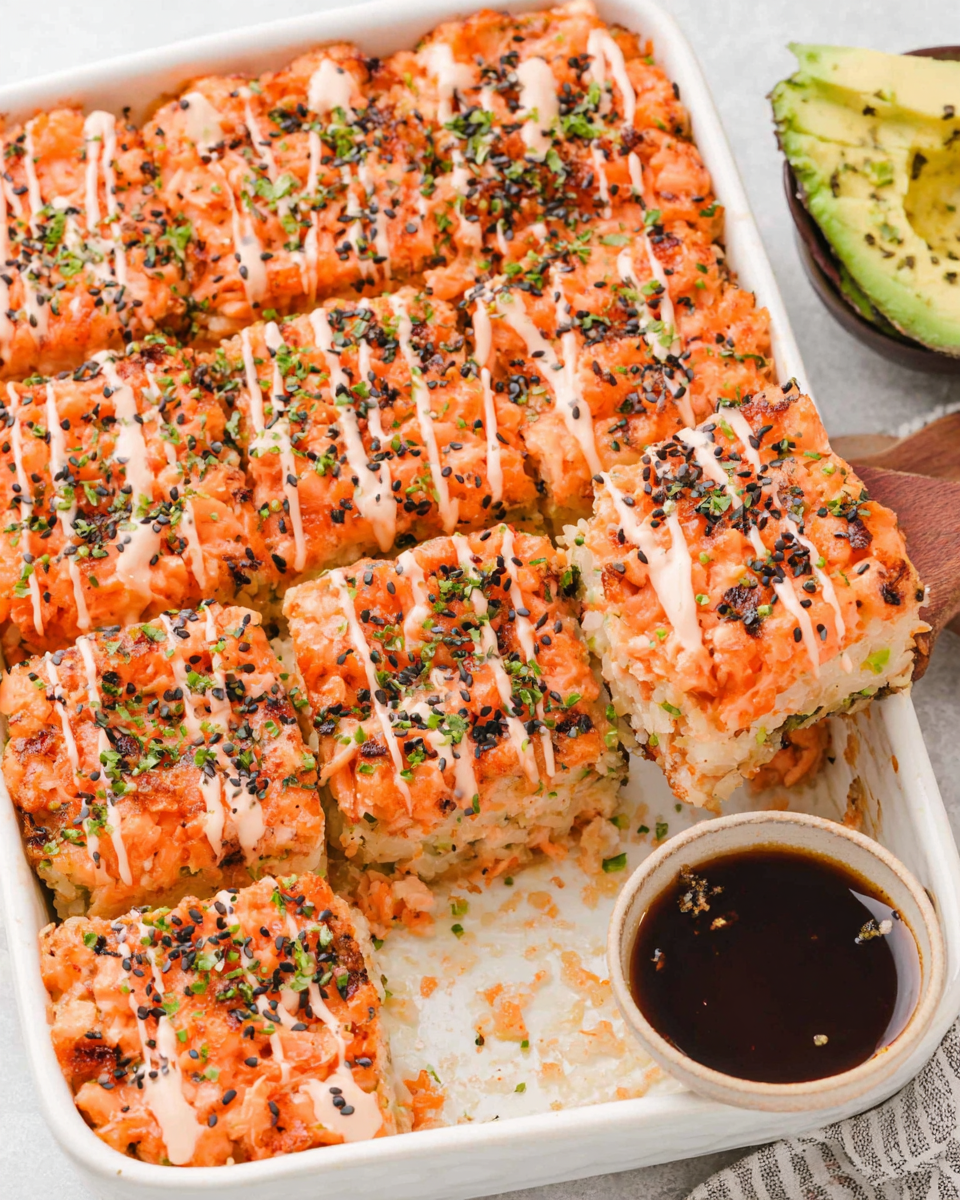
Imagine layers of seasoned sushi rice, creamy spicy salmon, and a crispy topping, all baked to perfection. It’s an easy recipe that transforms the way you think about sushi, making it accessible for everyone. As we delve into the ingredients and steps, you’ll find that this is not just a meal; it’s an experience your family will love.
Ingredients
- 2 cups sushi rice
Sushi rice is sticky and tender when cooked, making it the perfect base for the sushi bake. It holds together while providing a satisfying texture, which mimics traditional sushi. - 2 1/2 cups water
Water is essential for cooking the rice and achieving the right consistency. Sushi rice requires slightly less water than regular rice to maintain its unique chewy texture. - 8 ounces sushi-grade salmon
Fresh, high-quality salmon brings rich flavor and a melt-in-your-mouth quality to the dish. It's also packed with Omega-3 fatty acids, making it a nutritious choice. - 1/4 cup mayonnaise
Mayonnaise adds creaminess to the filling and helps bind the salmon mixture together. It also provides a rich flavor that complements the spiciness. - 2 tablespoons sriracha
Sriracha adds a spicy kick that enhances the flavor profile of the salmon. Adjust the amount according to your heat preference. - 1 teaspoon soy sauce
Soy sauce introduces umami flavor and saltiness, which enhances the overall taste of the salmon mixture. It balances the richness of the mayo. - 1 tablespoon rice vinegar
Rice vinegar adds a subtle acidity that brightens the dish. It contributes to the sushi flavor that makes this bake extraordinary. - 1/2 cup green onions, chopped
Green onions provide freshness and a mild onion flavor. They also add a lovely color contrast to the dish. - 1/2 cup panko breadcrumbs
Panko breadcrumbs create a crunchy topping when baked, adding texture and visual appeal. They are lighter and crispier than regular breadcrumbs. - 1 teaspoon sesame seeds
Sesame seeds add nutty flavor and an appealing crunch. They also enhance the dish's authentic Asian-inspired profile.
Directions & Preparation
Step 1: Rinse and cook the sushi rice according to package instructions.
Rinsing the rice removes excess starch, ensuring that the grains remain separate and don’t become gummy when cooked. Using a rice cooker or following the stovetop method will yield perfectly cooked rice, which is essential for the base of your sushi bake.
Step 2: Preheat your oven to 350°F (175°C).
Preheating the oven ensures even cooking throughout the sushi bake. A hot oven will help achieve that crispy topping you want without overcooking the bottom layers.
Step 3: In a bowl, mix the cooked sushi rice with rice vinegar and a pinch of salt.
Mixing in rice vinegar right after cooking infuses the sushi rice with flavor, resembling the taste of traditional sushi. This step is crucial for replicating the authentic sushi experience, while also ensuring a seasoned base.
Step 4: Spread the sushi rice evenly in a greased baking dish.
Evenly distributing the rice creates a sturdy foundation for your sushi bake. Pressing it down gently ensures that it holds its shape, making serving easier later.
Step 5: In a separate bowl, mix the chopped salmon, mayonnaise, sriracha, soy sauce, and green onions.
This step combines all the necessary flavors into the salmon mixture. The mayonnaise binds the ingredients while the sriracha gives it the spicy kick, making every bite packed with flavor.
Step 6: Spread the salmon mixture evenly over the rice layer in the baking dish.
Carefully layering the salmon atop the rice allows the flavors to meld during baking. Ensure an even spread so that each portion gets a bit of that delicious filling.
Step 7: Sprinkle the panko breadcrumbs evenly over the top of the salmon mixture.
Panko breadcrumbs are essential for giving the dish that crunchy contrast. They will crisp up beautifully in the oven, enhancing the overall texture when you serve it.
Step 8: Sprinkle sesame seeds on top for added flavor and texture.
Sesame seeds not only add a delightful crunch but also a nutty flavor. Their addition will enhance the visual appeal of the dish as well.
Step 9: Bake for 25-30 minutes or until the top is golden brown.
Baking for the right amount of time allows the flavors to blend harmoniously while ensuring the breadcrumbs achieve a crispy finish. Watch it closely toward the end to prevent burning.
Step 10: Remove from oven and let cool for a few minutes before serving.
Allowing the dish to cool slightly helps the layers set, making it easier to cut and serve. It also prevents you from burning your mouth on a hot bite!

Perfecting the Spicy Sauce
The spicy element of this bake is crucial to its character. Balancing the mayo and sriracha is key; you can adjust the heat level by adding more or less sriracha according to your taste. For extra flavor, consider mixing in a dash of lime juice or some chopped jalapeños for an added kick. This balance of creamy and hot should awaken your taste buds and leave you wanting more.
Layering Techniques for Success
The way you layer the ingredients in this sushi bake is essential for the best taste and texture. Ensure the rice is firmly pressed down to create a solid base that holds the salmon well. A thick layer of salmon is necessary for flavor; it shouldn’t be too thin or it may dry out or get lost under the breadcrumbs. Proper layering will lead to a dish that’s cohesive and satisfying.
Variations for Personal Touch
There are countless ways to personalize this spicy salmon sushi bake. Add in vegetables like avocado or cucumber for freshness, or even some crab meat for a mix of seafood flavors. Consider swapping out salmon for tuna or even a vegetarian alternative like grilled eggplant, maintaining the integrity of the bake while catering to diverse preferences.
FAQs
What if my salmon sushi bake turns out too dry?
If the bake is dry, you may have overcooked it, or the salmon might not have had enough moisture. Next time, consider adding more mayo or incorporating a splash of water before baking.
Can I double this spicy salmon sushi bake recipe for a gathering?
Yes, you can easily double the ingredients and use a larger baking dish. Just ensure you adjust cooking time, as it may require a bit longer to bake through.
What if the bottom layer of my sushi bake sticks to the dish?
To prevent sticking, make sure to grease the baking dish well before adding the rice. Using parchment paper can also help with easy removal.
Can I substitute other fish instead of salmon?
Absolutely! Tuna or even cooked shrimp can be great alternatives. Just ensure they are sushi-grade if you're using raw fish.
How can I make my sushi bake spicier?
To increase the heat, add more sriracha to the salmon mix or sprinkle cayenne pepper over the top before baking.
What if my panko breadcrumbs start to burn before the bake is fully cooked?
If you notice the breadcrumbs browning too quickly, cover the dish loosely with aluminum foil to prevent burning while allowing the rest of the bake to cook through.
Conclusion
This easy spicy salmon sushi bake is sure to be a crowd-pleaser at any dinner table. With its incredible flavors and textures, it simplifies the sushi experience without losing the essence of the cuisine. Perfect for busy weeknights or casual gatherings, this recipe is sure to impress both family and friends.
Embrace the fun of sharing a delicious, homemade meal, and don’t hesitate to personalize this sushi bake with your favorite ingredients. Happy cooking!
Recipe Card

Delicious Cheesy Spinach & Artichoke Stuffed Mushrooms
Ingredients
Method
- Preheat your oven to 375°F (190°C).
- Clean the mushrooms and remove stems. Set aside caps, and finely chop stems.
- In a skillet, heat some olive oil over medium heat and sauté the minced garlic until fragrant.
- Add chopped spinach, artichokes, and chopped mushroom stems to the skillet. Cook until spinach wilts.
- In a bowl, combine the sautéed mixture with cream cheese, Parmesan, mozzarella, red pepper flakes, salt, and pepper.
- Fill each mushroom cap generously with the cheese and spinach mixture.
- Place the stuffed mushrooms on a baking sheet and drizzle with olive oil.
- Bake in the preheated oven for 20-25 minutes until the mushrooms are tender and tops are golden.
- Remove from oven and let cool for a few minutes before serving.
Notes
Additional serving suggestions: pair with a crisp salad, garlic bread, or roasted seasonal vegetables for balance.
For make-ahead, prep components separately and assemble just before heating to preserve texture.
Taste and adjust with acid (lemon/vinegar) and salt right at the end to wake up flavors.


