Introduction
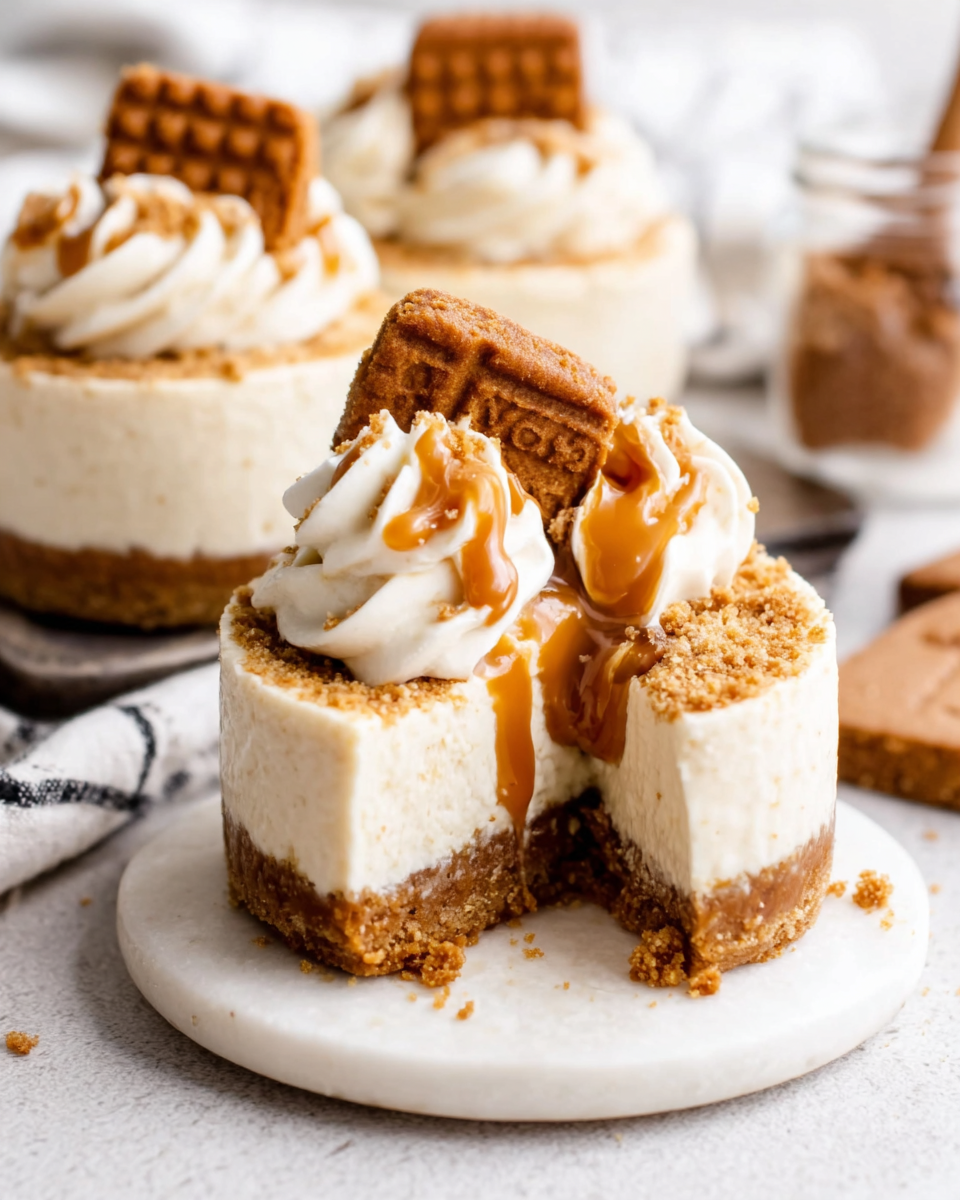
Cheesecakes have a special place in the hearts of many dessert lovers, and when it comes to a no-bake version, the ease of preparation only adds to their charm. Mini Biscoff cheesecakes embody a delightful combination of creamy richness and the unique spiced flavor of Biscoff cookies, making them an irresistible treat.
Whether you're celebrating a special event or simply satisfying your sweet tooth, these mini cheesecakes offer a perfect balance of texture and flavor. The buttery cookie base provides a satisfying crunch, while the smooth cheesecake filling is decadently flavored with Biscoff spread, creating a dessert that is both familiar and innovative.
Ingredients
- 12 Biscoff cookies
These cookies form the base for your cheesecake, providing a crunchy and flavorful foundation. Their spiced caramel taste complements the creamy filling perfectly. - 4 tablespoons unsalted butter, melted
Butter binds the crushed cookies together, creating a cohesive crust that maintains its shape. The richness of the butter also enhances the overall flavor. - 1 cup cream cheese, softened
As the main ingredient, cream cheese offers the creamy texture that is essential for a cheesecake. It provides a rich base that carries the flavors of the Biscoff spread wonderfully. - 1/2 cup powdered sugar
Powdered sugar sweetens the cheesecake to balance the flavors. Its fine texture means it blends seamlessly into the cream cheese without adding grittiness. - 1/2 cup Biscoff spread
This spread elevates the cheesecake, infusing it with the signature caramelized flavor of Biscoff cookies. It also gives the filling a creamy consistency. - 1 teaspoon vanilla extract
Vanilla enhances the overall flavor profile, bringing warmth and a touch of sweetness that complements the Biscoff spread. - 1/2 cup heavy cream, whipped
Whipping cream adds lightness and airiness to the cheesecake filling, yielding a texture that is both smooth and fluffy. - Extra Biscoff cookies for garnish
Crushed or whole cookies on top of the cheesecakes not only add visual appeal but also provide additional texture and flavor contrast in each bite.
Directions & Preparation
Step 1: Prepare the crust: Crush the Biscoff cookies and mix with melted butter.
Starting with the crust, crush the Biscoff cookies into fine crumbs, which can be easily accomplished using a food processor or a zip-top bag with a rolling pin. Mixing the crumbs with melted butter ensures that every crumb is coated, allowing for a firm and cohesive base when pressed into the cupcake liners. This step is crucial as it establishes the foundation for your cheesecakes.
Step 2: Press the mixture into the bottom of cupcake liners.
Using your fingers or the back of a spoon, press the cookie-butter mixture firmly into the bottom of each cupcake liner placed in a muffin tin. It’s important that the crust is compact, which prevents it from crumbling apart when you remove the cheesecakes later. A firm base supports the filling and helps maintain the structure during slicing for serving.
Step 3: In a mixing bowl, beat the cream cheese and powdered sugar until smooth.
This step is essential for achieving a silky filling. Start with softened cream cheese to ensure it blends easily without lumps. Gradually adding powdered sugar while mixing allows for better incorporation and a smoother texture. Beat until the mixture is creamy, making sure there are no lumps left, as a smooth filling is a hallmark of a great cheesecake.
Step 4: Add the Biscoff spread and vanilla extract, mixing until well combined.
Incorporating the Biscoff spread adds that signature flavor to your filling, making it rich and delicious. Continue to mix until fully blended with the cream cheese mixture; this ensures a uniform flavor throughout. The vanilla extract will enhance all the sweet notes, making the cheesecake even more delightful.
Step 5: Gently fold in the whipped cream until fully combined.
Folding in the whipped cream is crucial for lightening up the filling. This technique helps maintain the airiness of the whipped cream while ensuring it's evenly distributed throughout the cheesecake mixture. A well-folded filling yields a light and decadent texture that sweetens the taste experience with each bite.
Step 6: Spoon the filling into the prepared crusts, smoothing the tops.
With the crust set, transfer the cheesecake filling into each prepared crust using a spoon or piping bag for precision. Smoothing the tops makes for an appealing presentation when you serve them. This step is vital for creating an evenly layered dessert; a neat top gives it a polished look for guests or family.
Step 7: Chill in the refrigerator for at least 3 hours, or until set.
Chilling the cheesecakes allows the filling to firm up, creating a sliceable texture once ready to serve. This time in the fridge also helps meld the flavors together, improving taste. Be patient; the wait is worthwhile as the cheesecakes will be much more enjoyable with proper chilling.
Step 8: Garnish with extra Biscoff cookies before serving.
Adding crushed or whole Biscoff cookies on top right before serving enhances the visual appeal of your mini cheesecakes. It’s also a great way to signal the flavor inside, enticing your guests with a preview of the deliciousness they are about to enjoy. This step adds the final touch, elevating your presentation.

The Perfect Proportions for Creamy Goodness
Achieving the right balance between the cream cheese and Biscoff spread is key to a successful cheesecake. The cream cheese brings the rich and tangy elements to the mix, while the Biscoff spread adds a layer of sweetness and spiced flavor. This harmony results in a dessert that feels both indulgent and sophisticated, making each mini cheesecake a true delight.
Customization: Flavor Variations To Consider
While Biscoff has a uniquely delightful flavor, don’t hesitate to experiment with other cookie spreads. You could substitute with Nutella for a hazelnut twist, or try a chocolate spread for a richer experience. This opens the door to create variations that can appeal to various tastes, creating uniquely themed cheesecakes for any gathering.
Serving Suggestions for Any Occasion
These mini cheesecakes shine at any gathering, from casual get-togethers to elegant celebrations. Pair with a fresh berry compote for a bright contrast, or serve alongside a hot cup of coffee for a cozy coffee-house vibe. As they are individual-sized, they are convenient for serving at parties, allowing guests to indulge without the need for slicing a traditional cake.
FAQs
What should I do if my cheesecake filling turns out too thick?
If the filling is too thick, you can fold in a little extra whipped cream or milk to loosen it. Ensure to add gradually and mix gently to maintain the airiness.
Can I use half-fat cream cheese for this recipe?
Yes, using half-fat cream cheese will still yield a delicious cheesecake, but be aware that it may alter the texture slightly, making it less creamy.
How can I prevent the cheesecake from sticking to the liners?
Using high-quality cupcake liners or lightly greasing them can help prevent sticking. Ensure you gently lift the cheesecakes from the liners after chilling.
Is there a way to make this recipe more chocolatey?
Absolutely! You can mix cocoa powder directly into the filling or drizzle some melted chocolate on top before serving for an extra layer of chocolate flavor.
What can I do if I find the taste too sweet?
If you find the filling overly sweet for your taste, consider reducing the amount of powdered sugar or adding a pinch of salt to balance the sweetness.
Can I use a different type of cookie for the crust?
Yes! Other crunchy cookies like graham crackers or Oreo cookies can be excellent substitutes. Just adjust the amount of butter accordingly if the cookies yield different textures.
Conclusion
These No Bake Mini Biscoff Cheesecakes are not only a testament to the joy of simplicity in dessert making, but they also deliver on flavor and presentation. Their individual size makes them perfect for sharing yet indulgently satisfying for solo enjoyment.
With a few simple ingredients and minimal effort, you can create a dessert that enchants every palate. So whether you're baking for a casual brunch or an elegant celebration, these cheesecakes are sure to delight.
Recipe Card
Indulgent High Protein Low Carb Chocolate Cake
Ingredients
Method
- Preheat your oven to 350°F (175°C).
- Grease a 9-inch round cake pan and line the bottom with parchment paper.
- In a large mixing bowl, whisk together almond flour, cocoa powder, protein powder, erythritol, baking soda, and salt.
- In another bowl, beat the eggs, then add applesauce and vanilla extract until well combined.
- Combine the wet and dry ingredients, mixing just until no dry streaks remain.
- Pour the batter into the prepared cake pan, smoothing the top with a spatula.
- Bake for 25-30 minutes or until a toothpick inserted into the center comes out clean.
- Allow the cake to cool in the pan for 10 minutes before transferring it to a wire rack.
- Once cooled, frost as desired or enjoy plain.
Notes
Additional serving suggestions: pair with a crisp salad, garlic bread, or roasted seasonal vegetables for balance.
For make-ahead, prep components separately and assemble just before heating to preserve texture.
Taste and adjust with acid (lemon/vinegar) and salt right at the end to wake up flavors.


