
Introduction
There’s something undeniably comforting about warm, fresh bread. The aroma of dough baking in the oven, mingled with the earthy fragrance of garlic and rosemary, can transform any kitchen into a cozy haven. Rustic Garlic Rosemary Skillet Bread is an easy recipe that pairs beautifully with soups, salads, or simply enjoyed on its own with a pat of butter.
What makes this bread remarkable is its simplicity. With just a handful of ingredients and minimal effort, home cooks can create a delicious loaf that boasts a crisp, golden crust and a soft, flavorful interior. It's perfect for novice bakers and seasoned pros alike, giving everyone a chance to experience the joy of homemade bread.
Ingredients
- 2 cups all-purpose flour
All-purpose flour provides the structure for the bread and contributes to its chewy texture. Its balanced protein content is ideal for creating a well-risen loaf that isn’t overly dense. - 1 teaspoon active dry yeast
Yeast is the leavening agent that helps the bread rise, giving it a light and airy texture. Active dry yeast needs to be activated in warm water, ensuring that it becomes bubbly and effective. - 1 teaspoon salt
Salt enhances the overall flavor of the bread and regulates yeast activity. It also strengthens the gluten networks, contributing to the bread's structure. - 1 tablespoon fresh rosemary, chopped
Fresh rosemary imparts a fragrant, herbal note that complements garlic beautifully. It adds depth of flavor and a rustic appeal to the bread, making each bite aromatic. - 2 cloves garlic, minced
Garlic brings a robust, savory element to the bread. When roasted during baking, the garlic sweetness develops and mingles with the other flavors, creating a delightful taste experience. - 3/4 cup warm water
Warm water is essential for activating the yeast, allowing it to thrive and produce carbon dioxide. The ideal temperature is around 100-110°F; too hot could kill the yeast, and too cold may slow its action. - 1 tablespoon olive oil
Olive oil enriches the bread's texture and contributes to its moisture. It also enhances flavor and helps create a golden crust as the bread bakes.
Directions & Preparation
Step 1: Activate the yeast.
In a small bowl, combine the warm water and yeast, allowing it to sit for about 5-10 minutes until foamy. This step is crucial because it confirms that the yeast is alive and ready to work. If it doesn’t foam, your yeast may be expired, and you will need to start over to ensure your bread rises properly.
Step 2: Mix dry ingredients.
In a large mixing bowl, whisk together the flour, salt, chopped rosemary, and minced garlic. Combining these dry ingredients ensures even distribution of flavor throughout the dough. It also helps prevent clumping, leading to a more uniform bake.
Step 3: Combine wet and dry ingredients.
Once the yeast mixture is foamy, add it along with the olive oil to the dry mixture. Stir until a sticky dough forms. This is where the magic begins, as the yeast interacts with the flour and begins to form gluten. Don’t worry if it seems too sticky; that’s a sign of a moist and flavorful bread.
Step 4: Knead the dough.
Turn the dough out onto a lightly floured surface and knead for about 5-7 minutes until smooth. Kneading develops the gluten structure, which gives bread its elasticity and helps it rise. If the dough sticks to your hands, sprinkle a touch more flour but be cautious not to add too much, as it may affect the texture.
Step 5: First rise.
Place the dough in a greased bowl, cover it with a damp cloth, and let it rise in a warm place for about 1 hour, or until doubled in size. This rising time is crucial as it allows the yeast to ferment, producing gases that expand the dough, leading to a lighter texture in the final bread.
Step 6: Preheat the skillet.
While the dough is rising, place a cast-iron skillet in the oven and preheat it to 425°F. Preheating the skillet helps create a crispy crust right from the start, giving the bread a beautiful texture and ensuring even baking.
Step 7: Shape the dough.
After the dough has risen, gently punch it down to release the gases and shape it into a round loaf. This shaping helps create surface tension, contributing to a better rise during baking. Avoid excessive handling that could deflate the dough completely.
Step 8: Transfer to skillet.
Carefully remove the hot skillet from the oven and add the dough. You can use a serrated knife to make a few shallow slashes across the top for a rustic finish. These slashes help the bread expand during baking and prevent it from bursting in unpredictable places.
Step 9: Bake the bread.
Place the skillet back in the oven and bake for 25-30 minutes, or until the bread is golden brown and sounds hollow when tapped on the bottom. The baking process allows the crust to form, while the interior remains soft and airy. Make sure to keep an eye on the bread to avoid overbaking.
Step 10: Cool before slicing.
Once baked, remove the skillet from the oven and allow the bread to cool on a wire rack for at least 10 minutes. This cooling period helps set the crumb and allows excess steam to escape, resulting in a better texture. Slicing too early can lead to a gummy bread.

Why Use Rosemary in Bread?
Rosemary isn't just a flavoring ingredient; it brings with it health benefits too. Rich in antioxidants and anti-inflammatory compounds, rosemary adds a fragrant essence that elevates the rustic charm of this bread. The herb's scent can also invigorate your senses, making the process of baking not only productive but also pleasurable.
The Role of Garlic in Flavor Development
Minced garlic adds a pronounced flavor that contrasts beautifully with the earthiness of the rosemary. As the bread bakes, the garlic sweetens and mellows, enhancing the savory notes. This duality of flavors creates an inviting aroma and a rich taste that’s bound to become a household favorite.
Baking in a Skillet: Advantages Explained
Using a skillet for baking bread enhances the crust's quality due to the direct heat from the cast iron. It also allows the bread to rise properly while forming a crispy exterior. The skillet method is not only practical for stovetop or oven use but also contributes to an appealing rustic presentation directly from oven to table.
FAQs
What if I don’t have fresh rosemary?
You can substitute with dried rosemary, but use only about one-third of the amount since dried herbs are more concentrated in flavor. Alternatively, other herbs like thyme or oregano can also work well for a different flavor profile.
What can I do if my dough feels too sticky?
If your dough is overly sticky, sprinkle in small amounts of flour while kneading to achieve the right consistency. Just be cautious to add flour gradually to maintain the desired moisture in the bread.
Can I add cheese to the bread?
Yes! Incorporating cheese like shredded cheddar or crumbled feta into the dough can enhance flavor and add a delightful richness. Simply fold in your cheese of choice during the mixing stage.
What if my bread is too dense?
Density can often be attributed to under-kneading the dough or not allowing it enough rise time. Make sure to knead until smooth and give it ample time to double in size during the first rise.
Can I use a different type of oil?
Yes, you can substitute olive oil with another oil like avocado or melted butter for a different flavor profile. Just keep in mind that the taste of the bread may vary slightly based on the oil used.
What should I do if my skillet bread overbakes?
If your bread has overbaked, consider using it for croutons or breadcrumbs, turning a mistake into a tasty alternative. For future bakes, keep a close watch as oven temperatures can vary.
Conclusion
Rustic Garlic Rosemary Skillet Bread is more than just a recipe; it’s an experience that can fill your home with warmth and joy. With its simple ingredients and straightforward process, baking this bread is accessible to everyone. Embrace the art of creating something delicious from scratch.
So, whether you’re preparing for a cozy dinner, a family gathering, or simply looking to enjoy a wholesome bite, this skillet bread will undoubtedly become a cherished addition to your cooking repertoire. Grab your skillet and get baking!
Recipe Card
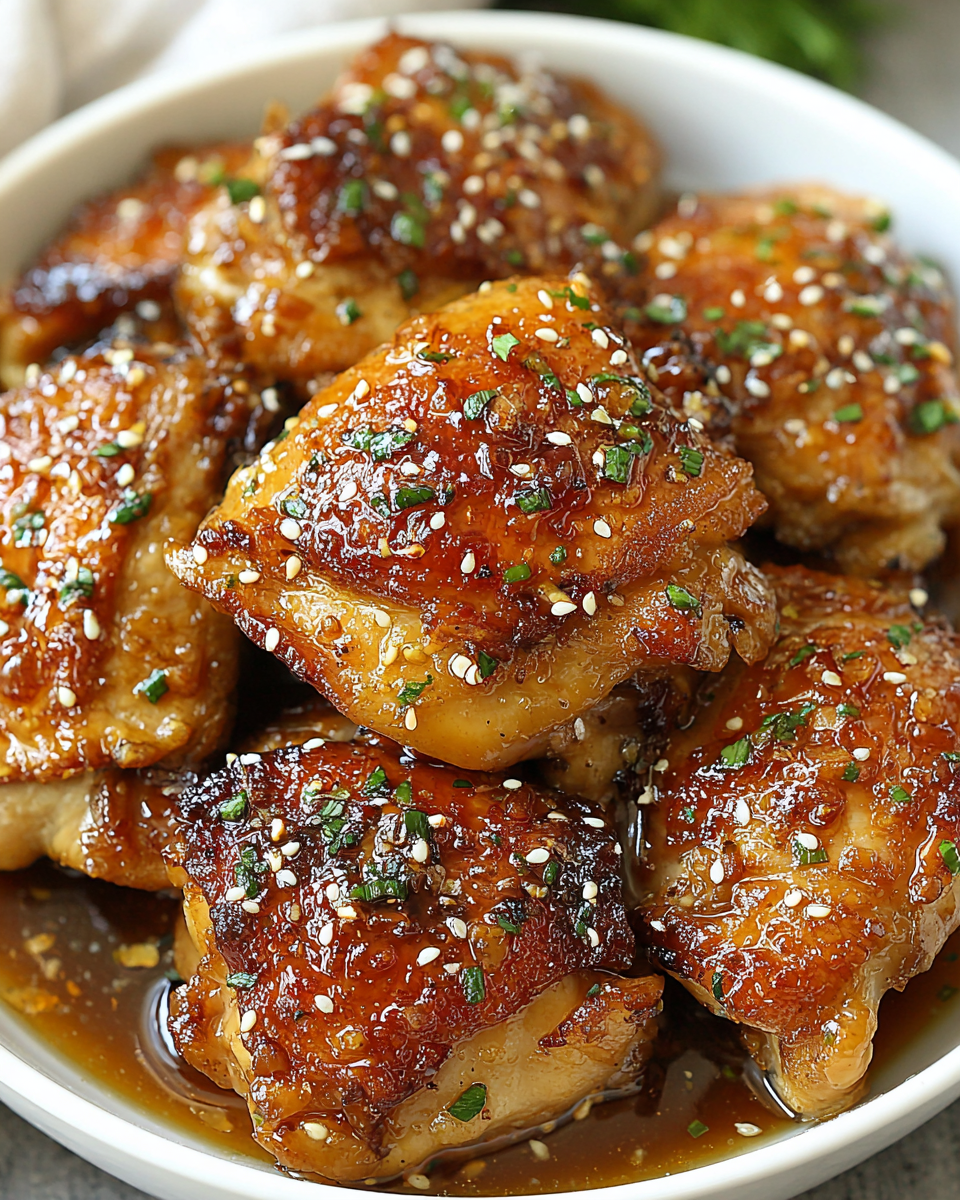
Sweet and Savory Honey Garlic Chicken Thighs Recipe
Ingredients
Method
- Prepare the chicken thighs by patting them dry and seasoning with salt and pepper.
- In a mixing bowl, whisk together honey, soy sauce, minced garlic, apple cider vinegar, black pepper, and sesame oil.
- Place chicken thighs in the slow cooker and pour the sauce over them.
- Set the slow cooker to low and cook for 4-5 hours, or until chicken is tender and fully cooked.
- Once cooked, remove chicken from the slow cooker and let it rest briefly before serving.
- Serve the chicken thighs garnished with sliced green onions and drizzled with additional sauce from the slow cooker.
Notes
Additional serving suggestions: pair with a crisp salad, garlic bread, or roasted seasonal vegetables for balance.
For make-ahead, prep components separately and assemble just before heating to preserve texture.
Taste and adjust with acid (lemon/vinegar) and salt right at the end to wake up flavors.


