Introduction
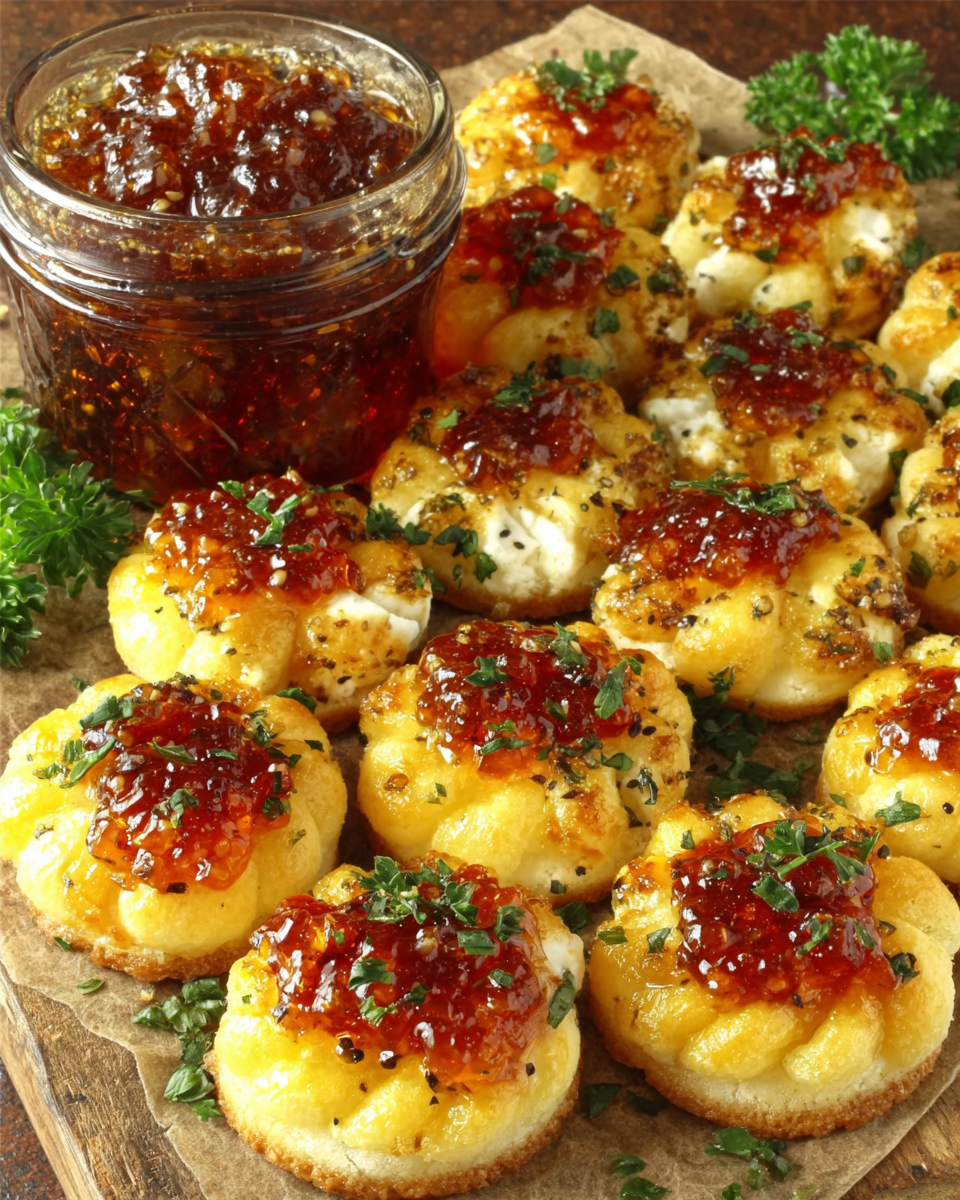
Cheesy thumbprint appetizers are a delightful twist on traditional bites, offering both comfort and flair for any gathering. Pairing creamy, melted cheese with a kick from hot pepper jelly creates a unique flavor experience that will keep your guests coming back for more.
These cheerful little bites are simple to prepare and can be made ahead of time, making them perfect for parties or casual get-togethers. With a flavorful combination of ingredients, you’ll be surprised at how much joy these small morsels can bring to your table.
Ingredients
- 1 cup shredded cheddar cheese
Sharp cheddar adds a rich, tangy flavor that pairs beautifully with the sweetness and heat of the jelly. It also provides a gooey texture when melted that enhances the overall experience. - 1/2 cup cream cheese, softened
Cream cheese creates a smooth, creamy base that helps bind the ingredients together. Its mild flavor balances the sharpness of the cheddar, resulting in a well-rounded taste. - 1 cup all-purpose flour
Flour is essential for creating the right dough consistency, contributing to the structure and stability of the thumbprints. It allows the appetizers to hold their shape while baking. - 1/4 teaspoon garlic powder
Garlic powder adds depth to the flavor profile, giving a subtle background note that rounds out the cheeseiness while not overwhelming the dish with bold flavors. - 1/2 teaspoon salt
Salt enhances all the other flavors present, ensuring a balanced taste and preventing the final product from tasting flat or bland. - 1/4 teaspoon black pepper
Black pepper introduces a pleasant spice that complements the heat from the jelly while also providing a gentle warmth in the bite. - 1/2 cup hot pepper jelly
The hot pepper jelly is the star of the dish, offering a sweet and spicy contrast to the cheesy base. It adds a burst of flavor that elevates the entire appetizer.
Directions & Preparation
Step 1: Preheat your oven to 350°F (180°C).
Preheating the oven is crucial as it ensures that the appetizers cook evenly and reach the desired texture. An adequately heated oven will create a crispy exterior while keeping the cheese perfectly melted.
Step 2: In a mixing bowl, combine the shredded cheddar cheese and softened cream cheese.
This combination forms the cheesy base of the thumbprints. Mix these cheeses until they are well-integrated, as it will enhance the melting process and create a smooth and cohesive texture.
Step 3: Add flour, garlic powder, salt, and black pepper into the cheese mixture.
Incorporating these dry ingredients helps form the dough. Each element has a role: the flour provides structure, while garlic powder and spices enhance flavor. Make sure to mix thoroughly for an even distribution.
Step 4: Mix until a soft dough forms, ensuring no dry flour is left.
A soft dough is essential for the thumbprint shape, allowing it to hold its form once baked. If the dough feels too sticky, use a little extra flour, but be cautious not to add too much.
Step 5: Scoop tablespoon-sized portions of dough and roll them into balls.
Rolling the dough into uniform balls guarantees even cooking and consistent size. Using an ice cream scoop can make this step easier and less messy.
Step 6: Place dough balls on a baking sheet lined with parchment paper, about two inches apart.
Spacing is important to prevent sticking during baking. The parchment paper ensures easy removal and cleanup, allowing for a perfectly baked appetizer without the hassle.
Step 7: Using your thumb, gently press down in the center of each ball to create a well, but do not flatten them completely.
Creating an indention is what defines these as thumbprint appetizers, allowing room for the jelly. Make sure not to press too hard, or they won't hold their nice shape.
Step 8: Fill each thumbprint with hot pepper jelly, just enough to fill the well without overflowing.
This is where the signature flavor comes in; filling each thumbprint correctly balances the cheese base with the sweet and spicy jelly. Too much jelly can cause spilling during baking.
Step 9: Bake for 15-20 minutes or until the edges are golden brown.
Baking at the right temperature and time leads to crispy edges while keeping the center gooey. Keep an eye on them towards the end to prevent over-baking.
Step 10: Remove from the oven and allow to cool slightly before serving.
Letting them cool gives the flavors time to settle and also makes them easier to handle. Enjoy your cheesy thumbprints warm for the ultimate experience!

Cheesy Bliss in Every Bite
Cheesy thumbprint appetizers combine two crowd-pleasers: cheese and jelly, creating a perfect balance of flavors. The cheddar and cream cheese meld into a comforting base that is enhanced by the sweet and spicy profile of the hot pepper jelly, making each bite a delightful surprise that is sure to impress guests.
Perfect for Any Occasion
These appetizers are versatile, perfect for casual snacking, festive gatherings, or upscale parties alike. Their elegant presentation and robust flavor profile make them suitable for a variety of settings, ensuring they’ll charm everyone around the table.
Customization Opportunities
While this recipe highlights cheddar and hot pepper jelly, it offers a platform for experimentation. You can customize the cheeses used or try different flavors of jelly to create variations that match your taste preferences, making it a truly personalized appetizer option.
FAQs
What can I substitute for hot pepper jelly?
You can use other jellies like red pepper jelly for a milder flavor or even try a fruit-based jelly like apricot, which adds a different sweetness.
What if my dough feels too dry?
If your dough is too dry, add a small amount of cream cheese or a little water, one teaspoon at a time, until the mixture holds together well.
Can I use different cheeses instead of cheddar?
Absolutely! You can experiment with gouda, mozzarella, or even feta to create new flavor combinations that suit your palette.
How do I make the thumbprints deeper?
If you want a deeper well for jelly, use your thumb or a small spoon to press down more firmly, ensuring you don’t flatten the dough too much.
What can I do if the jelly overflows?
If jelly spills over during baking, simply use a knife to carefully remove extra jelly before serving, ensuring the presentation remains appealing.
Can I double this recipe for a bigger crowd?
Yes, doubling the recipe is perfectly fine! Just ensure that your baking sheets can accommodate the extra dough and bake in batches if necessary.
Conclusion
Cheesy thumbprint appetizers with hot pepper jelly are an easy yet elegant addition to any gathering. Their unique blend of flavors will leave everyone asking for the recipe, and they are easily customizable to suit various tastes.
With minimal ingredients and straightforward preparation, you can enjoy the process of making these bites just as much as the delicious results. Don't hesitate to whip up a batch for your next event or simply as a tasty treat for yourself!
Recipe Card

Honey Roasted Beets and Carrots for Vibrant Flavors
Ingredients
Method
- Preheat the oven to 425°F (220°C).
- Prepare the beets and carrots by cutting them into uniform sizes.
- In a large bowl, combine the beets and carrots with olive oil, honey, salt, and pepper.
- Spread the vegetables on a baking sheet lined with parchment paper.
- Roast in the oven for about 25-30 minutes, stirring halfway through.
- Remove from the oven and let cool slightly before garnishing with herbs.
Notes
Additional serving suggestions: pair with a crisp salad, garlic bread, or roasted seasonal vegetables for balance.
For make-ahead, prep components separately and assemble just before heating to preserve texture.
Taste and adjust with acid (lemon/vinegar) and salt right at the end to wake up flavors.


