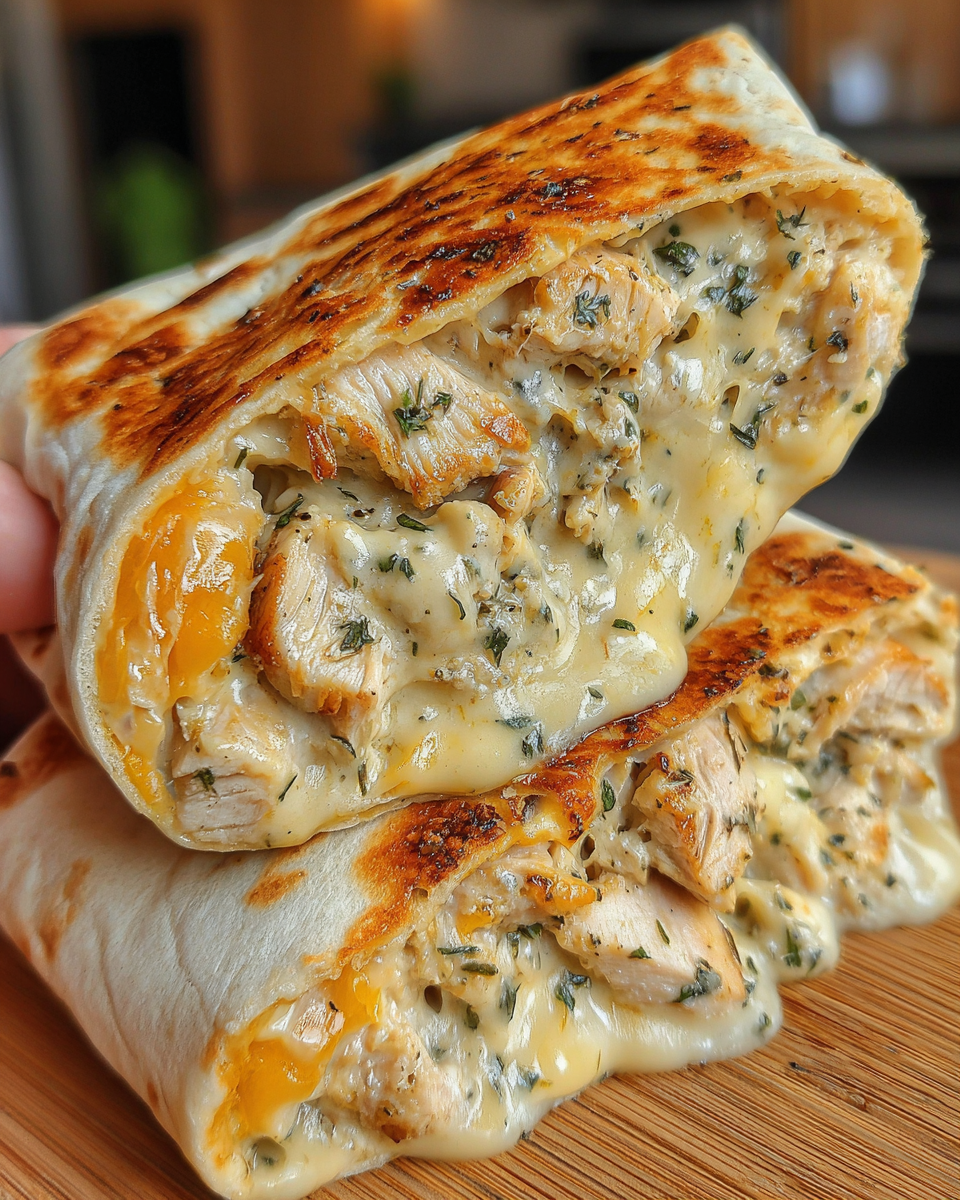
Introduction
There's something incredibly satisfying about a warm, cheesed-filled wrap, especially when it’s quick to make and packed with flavor. These Cozy Cheesy Garlic Chicken Wraps are your ticket to a delightful lunch that you can whip up in no time. Perfect for busy days, these wraps transform tender chicken into a melty, cheesy experience that feels indulgent without demanding hours in the kitchen.
The garlic aroma that wafts through the air while preparing these wraps immediately sets a cozy mood. Whether you're enjoying them at home or heating them up for a picnic, each bite is sure to tickle your taste buds and warm your heart. Let’s dive into creating these delicious wraps that are sure to become a new favorite in your lunch rotation.
Ingredients
- 2 cups cooked chicken, shredded
Using cooked chicken makes this recipe quick and easy. You can use leftovers from a previous meal or rotisserie chicken to save time. - 1 cup shredded mozzarella cheese
Mozzarella adds a beautiful melting quality that makes each wrap gooey and satisfying. Its mild flavor complements the garlic perfectly. - 2 tablespoons butter
Butter enhances the flavor of the wraps and ensures a perfectly golden, crispy exterior when grilled. - 4 large flour tortillas
Tortillas serve as the essential base for these wraps, holding all the delicious ingredients together while providing a soft bite. - 4 cloves garlic, minced
Garlic infuses the wraps with robust flavor, elevating the overall dish and adding a layer of savory goodness. - 1 teaspoon Italian seasoning
This blend of herbs enhances the overall flavor profile, offering a fragrant touch that complements the chicken. - Salt and pepper to taste
Seasoning adjusts the flavor of the filling, ensuring that every bite is as delicious as you want it to be. - 1 cup spinach or lettuce (optional)
Adding greens introduces a refreshing crunch and additional nutrients to balance the rich, cheesy filling.
Directions & Preparation
Step 1: Prepare the chicken filling.
Start by shredding your cooked chicken into bite-sized pieces. This makes it easier to mix with other ingredients and ensures that every bite is packed with flavor. If you’re using leftover chicken, make sure it’s fine enough to mesh well with cheese and garlic.
Step 2: Sauté garlic in butter.
In a skillet, melt the butter over medium heat and add the minced garlic. Sauté until fragrant, about 1-2 minutes, but be careful not to let it burn. This step not only brings out the sweetness of garlic but also infuses the butter with robust flavor, which will coat the chicken.
Step 3: Mix chicken with sautéed garlic and seasoning.
In a bowl, combine the shredded chicken with the sautéed garlic, Italian seasoning, and a sprinkle of salt and pepper. This mixture will be the heart of your wraps, so ensure it's well combined for even seasoning throughout, making every bite flavorful.
Step 4: Assemble the wraps.
Lay out the tortillas and evenly distribute the chicken mixture onto the center of each. Top with shredded mozzarella and any optional greens if using. Be careful not to overfill; you want to be able to roll them up without spilling. This step is crucial for making sure they hold together well during cooking.
Step 5: Roll the tortillas.
Fold in the sides of the tortilla and then roll tightly from the bottom up. This technique locks in all the delicious fillings and prevents any spillage. If they feel loose, you might want to practice rolling another one until you get a good grip.
Step 6: Grill the wraps.
Place the wraps seam-side down in the same skillet or on a grill over medium heat. Cook for 3-4 minutes per side or until golden brown and the cheese is melted. This step gives the wraps their satisfying crispiness and ensures the inside gets melty and cohesive.
Step 7: Slice and serve.
Once cooked, remove the wraps from heat and let them cool for a minute. This resting time allows the cheese to set slightly, making them easier to slice. Cut in half and serve warm for a cozy, comforting meal.

Elevating Wraps with Fresh Greens
Incorporating fresh spinach or other greens not only adds a nice crunch to your Cozy Cheesy Garlic Chicken Wraps but also enhances their nutritional value. Greens introduce a refreshing contrast to the richness of the chicken and cheese, making each bite more balanced and enjoyable. Consider using seasonal greens for an added flavor boost.
Cheese Alternatives for Every Palate
While mozzarella is the traditional choice for these wraps, don’t hesitate to explore other cheese options that suit your taste. For a sharper flavor, try cheddar or pepper jack; they bring distinct tastes that can elevate the dish further. Experimenting with cheese can create an exciting twist on this recipe, perfect for curating your unique flavor profile.
Dip into Garlic Sauce Bliss
To amplify the garlicky goodness of these wraps, consider making a simple garlic sauce for dipping. Combine yogurt, more minced garlic, and a dash of lemon juice for a refreshing contrast to the rich wraps. This sauce can serve as a perfect accompaniment, allowing you to enjoy the wraps in a whole new light.
FAQs
What if I want to add more veggies to my wraps?
Feel free to toss in any sautéed or fresh vegetables like bell peppers or onions. Just make sure to balance them with the cheese and chicken for optimal flavor.
Can I use precooked frozen chicken for the filling?
Yes, precooked frozen chicken can work well. Just make sure to thaw and heat it properly before mixing with the other ingredients.
What should I do if my wraps turn out too greasy?
If the wraps are greasy, reduce the amount of butter used for cooking. You can also drain excess butter after sautéing the garlic before mixing it with the chicken.
How can I make my chicken filling more flavorful?
Increase the amount of garlic or add a splash of hot sauce for additional heat. You can also incorporate fresh herbs like parsley for a burst of flavor.
What can I do if the cheese isn’t melting properly?
If the cheese doesn’t melt as expected, make sure your wraps are cooking long enough or lower the heat to allow time for the cheese to melt without burning the tortilla.
Can I adjust the recipe for a vegetarian option?
Absolutely! Substitute the chicken with sautéed mushrooms, zucchini, or a mix of your favorite vegetables for a hearty vegetarian version.
Conclusion
These Cozy Cheesy Garlic Chicken Wraps deliver comfort and flavor in every bite, making them an easy solution for lunch or dinner. With minimal ingredients and a quick cooking time, they fit seamlessly into any busy schedule.
Whether you’re enjoying them at home or packing them for a picnic, the melty, cheesy goodness combined with the savory garlic flavor will surely satisfy. So gather your ingredients, and dive into making these delightful wraps—they’re bound to become a cherished recipe in your collection.
Recipe Card
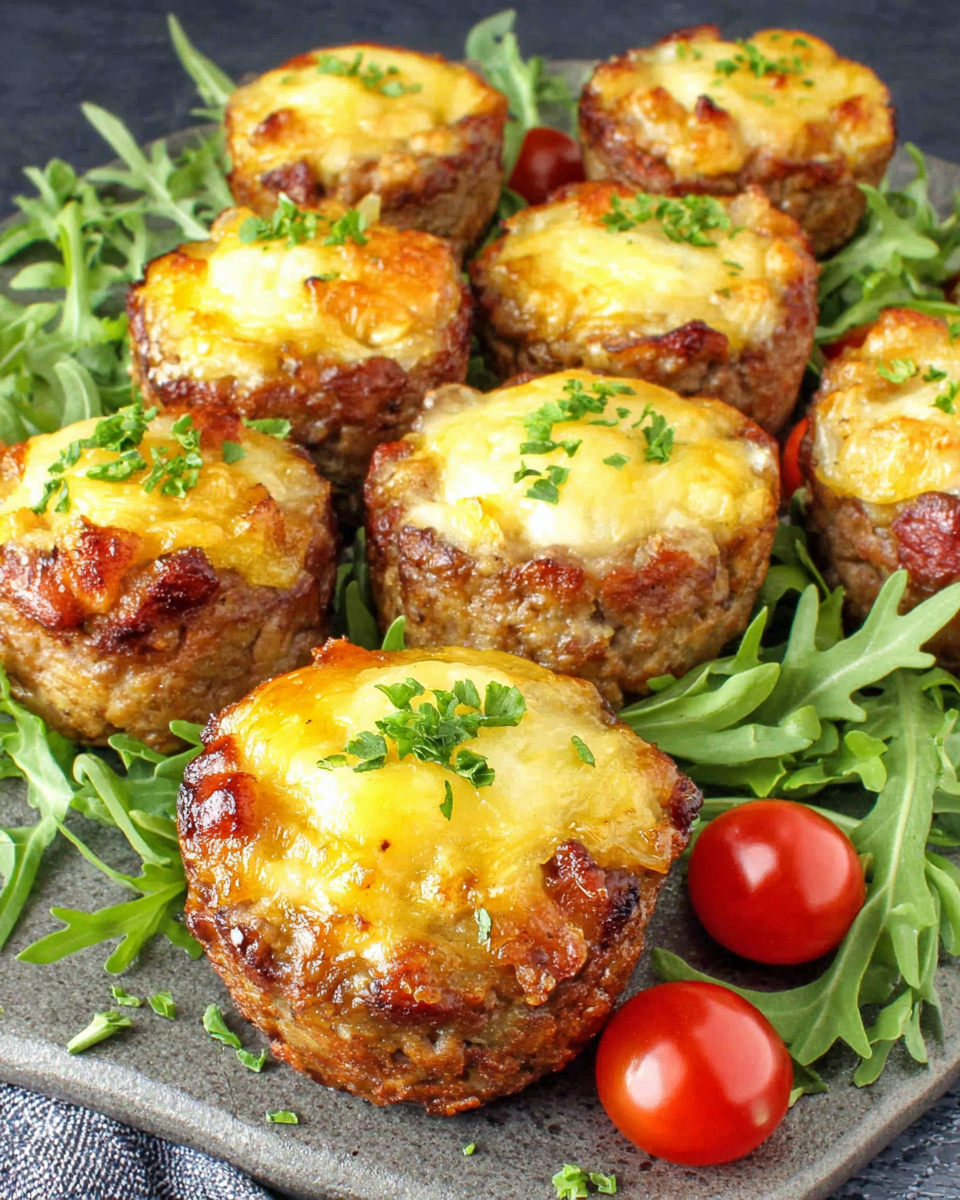
Simple and Flavorful Meatloaf Cups for Dinner
Ingredients
Method
- Preheat the oven to 375°F (190°C).
- In a large bowl, combine all the ingredients.
- Grease a muffin tin lightly with non-stick spray or oil.
- Scoop the meat mixture into each muffin cup, filling them about 3/4 full.
- Top each cup with a teaspoon of ketchup.
- Bake in the preheated oven for 20-25 minutes.
- Let the cups cool slightly before removing them from the tin.
Notes
Additional serving suggestions: pair with a crisp salad, garlic bread, or roasted seasonal vegetables for balance.
For make-ahead, prep components separately and assemble just before heating to preserve texture.
Taste and adjust with acid (lemon/vinegar) and salt right at the end to wake up flavors.


