Introduction
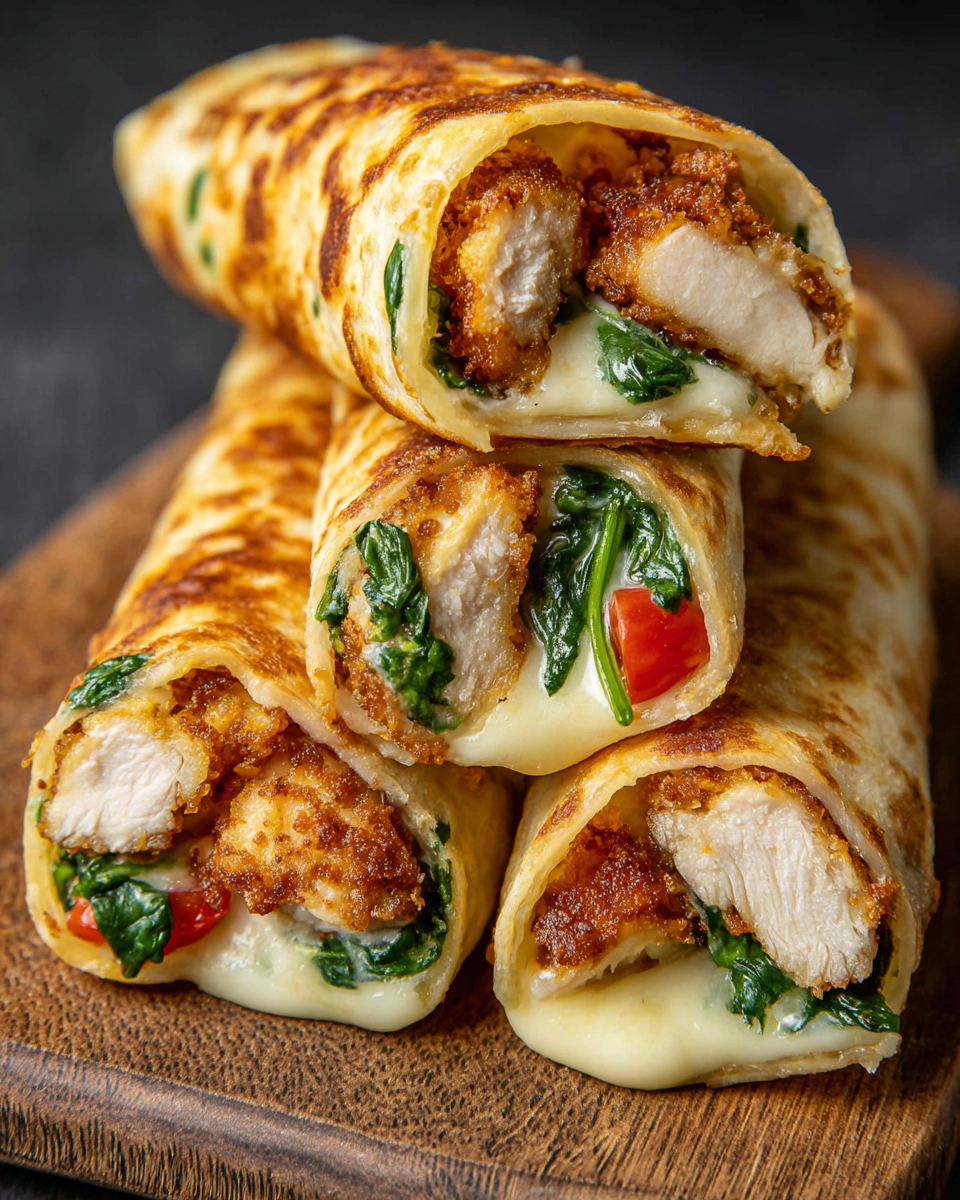
Air fryer recipes are a game-changer for home cooks, combining convenience with deliciousness. One standout option is crunchy crispy air fryer chicken and mozzarella wraps. This dish perfectly marries juicy chicken with gooey mozzarella, all encased in a golden, crispy wrap.
Whether you're looking for a quick weeknight dinner or a party appetizer, these wraps deliver on taste and texture. The air fryer method not only cuts down on cooking time but also makes it easier to achieve that satisfying crunch without the mess of deep frying.
Ingredients
- 2 large chicken breasts, cut into strips
Chicken breasts are the primary protein source, providing a tender and juicy base for the wraps. Cutting them into strips allows for quicker cooking and better seasoning absorption. - 1 cup panko breadcrumbs
Panko breadcrumbs add an irresistibly crunchy texture to the wraps. They are lighter than traditional breadcrumbs, ensuring that the wraps are crispy without being overly heavy. - 1 teaspoon garlic powder
Garlic powder enhances the savory flavor of the chicken, complementing the other ingredients. It's convenient and delivers a concentrated garlic taste that is essential in many savory dishes. - 1 teaspoon onion powder
Onion powder contributes depth and sweetness to the wraps. Like garlic powder, it offers a strong flavor while being easy to incorporate into the coating without the need for chopping onions. - 1 teaspoon paprika
Paprika brings a subtle smokiness and a hint of color to the wraps. It not only elevates the aesthetic but also rounds out the flavor profile, making the dish more appealing. - Salt and pepper, to taste
Basic seasonings like salt and pepper are crucial for enhancing all other flavors in the dish. They bring balance and highlight the natural tastes of the chicken and cheese. - 1 cup shredded mozzarella cheese
Mozzarella cheese adds creaminess and a rich flavor, melting beautifully within the wraps. It's a classic choice for its stretchiness and mild taste, making these wraps extra indulgent. - 4 large tortillas (flour or whole wheat)
The tortillas serve as the vessel to hold all the delicious ingredients together. Choosing either flour or whole wheat adds a different dimension to the wraps, depending on your preference. - Olive oil spray
A light spray of olive oil helps to achieve that perfect golden-brown crispiness on the wraps. It ensures the breadcrumbs adhere well while providing moisture without excessive fat.
Directions & Preparation
Step 1: Preheat the air fryer to 400°F (200°C).
Preheating the air fryer ensures that the wraps cook evenly and achieve that desired crispiness right from the start. This step is often overlooked but critical in ensuring a uniform cook throughout.
Step 2: In a medium bowl, mix the panko breadcrumbs with garlic powder, onion powder, paprika, salt, and pepper.
Combining the seasonings with the panko breadcrumbs creates a flavorful coating that will adhere to the chicken. Mixing them together before coating helps ensure that each bite of chicken is well-seasoned, enhancing the overall taste.
Step 3: Dredge the chicken strips in the breadcrumb mixture, pressing firmly to adhere.
Coating the chicken strips thoroughly allows for maximum crunch when air-frying. Pressing the mixture onto the chicken ensures that the breadcrumbs stick well, creating a delightful crunch in each wrap.
Step 4: Place the coated chicken in the air fryer basket in a single layer, ensuring they do not overlap.
Arranging the chicken in a single layer helps the hot air circulate properly around each strip, ensuring even cooking and crisping. Overlapping the chicken could lead to steaming instead of frying.
Step 5: Spray the chicken with olive oil and cook for 10–12 minutes, flipping halfway through.
Spraying the chicken with olive oil aids in achieving a golden-brown finish by providing moisture while encouraging crisping. Flipping halfway ensures both sides receive equal exposure to the heating element.
Step 6: Once the chicken is golden and cooked through, remove it from the air fryer and allow it to cool slightly.
Allowing the chicken to cool slightly prevents burns and enables easier handling when assembling the wraps. It also allows the juices to redistribute for a more succulent bite.
Step 7: On each tortilla, layer shredded mozzarella and a few chicken strips.
Layering mozzarella directly next to the warm chicken ensures it melts slightly, becoming creamy and delicious. This combination creates a balance between the crunchy texture of the chicken and the gooey cheese.
Step 8: Roll each tortilla tightly, tucking in the ends as you go.
Tightly rolling the tortilla is key to keeping the filling secure during the air-frying process. Tucking in the ends not only prevents spillage but also adds to the overall presentation of your wraps.
Step 9: Place the wraps seam-side down in the air fryer basket and spray with olive oil.
Positioning the wraps seam-side down helps them hold their shape as they cook. Spraying the outside of the wraps gives them an extra crispy exterior, enhancing the texture.
Step 10: Cook for an additional 5–7 minutes until the wraps are golden-brown and crispy.
Cooking the wraps until they are golden-brown ensures a perfectly crunchy exterior. Monitoring visual cues at this stage is crucial to prevent overcooking and maintaining desired texture.
Step 11: Remove the wraps from the air fryer and let them cool slightly before slicing.
Allowing the wraps to cool briefly helps set the layers inside, making them easier to slice without losing their shape. This final step ensures that every bite remains perfectly intact.

The Versatility of Wraps
Wraps are a fantastic culinary canvas, easily adaptable to suit various tastes and dietary preferences. You can switch up the protein by using turkey, beef, or even plant-based alternatives. Additionally, experimenting with different cheeses or adding vegetables such as spinach or bell peppers can add extra flavor and nutrition.
Crispy Coating Secrets
Achieving the ideal crispy coating is all about technique and the right ingredients. The use of panko breadcrumbs is pivotal, as their larger flake size compared to regular breadcrumbs provides that distinct crunch. Moreover, ensuring each piece is well-coated and utilizing a spray of oil are key factors in developing a golden-brown crust.
Perfect Pairings for Dipping
These chicken and mozzarella wraps are delightful on their own, but they can be elevated with the right sauces. Consider serving them with marinara for a classic Italian touch or a spicy aioli to introduce some heat. Not only do dips enhance flavor, they also create an interactive dining experience, perfect for gatherings.
FAQs
What if my wraps turn out too soggy?
If the wraps are soggy, ensure that your air fryer is properly preheated and avoid overcrowding the basket. A quick spray of olive oil can also help achieve crispiness.
Can I substitute chicken with another protein?
Absolutely! You can use turkey strips, pork tenderloin, or even plant-based protein like tofu for a vegetarian option to keep the dish flavorful and exciting.
What type of tortillas work best?
Flour tortillas are generally softer and easier to roll, while whole wheat tortillas provide a hearty flavor. Both work well, so choose based on your dietary preferences.
How do I know when the chicken is cooked through?
Using a meat thermometer, the internal temperature should reach at least 165°F (74°C) for safe consumption. Visual cues include a golden-brown color and no pink remaining.
What could I do if the cheese doesn't melt properly?
If the cheese isn’t melting, ensure you're using a good quality mozzarella and consider giving the wraps an extra minute or two in the air fryer. Warmth and moisture are key.
Can I add vegetables to the wraps?
Yes, feel free to incorporate vegetables like bell peppers, spinach, or even cooked onions for added flavor and nutrition, enhancing the overall dish.
Conclusion
Crunchy crispy air fryer chicken and mozzarella wraps are an easy and delightful meal option for any occasion. They perfectly combine convenience and flavor, making them a fantastic choice for busy families or a quick snack.
With a little creativity, these wraps can be easily tailored to suit your personal preferences. Enjoy the satisfying crunch and melty goodness, and revel in the smiles they bring to those around your dining table.
Recipe Card

Honey Roasted Beets and Carrots for Vibrant Flavors
Ingredients
Method
- Preheat the oven to 425°F (220°C).
- Prepare the beets and carrots by cutting them into uniform sizes.
- In a large bowl, combine the beets and carrots with olive oil, honey, salt, and pepper.
- Spread the vegetables on a baking sheet lined with parchment paper.
- Roast in the oven for about 25-30 minutes, stirring halfway through.
- Remove from the oven and let cool slightly before garnishing with herbs.
Notes
Additional serving suggestions: pair with a crisp salad, garlic bread, or roasted seasonal vegetables for balance.
For make-ahead, prep components separately and assemble just before heating to preserve texture.
Taste and adjust with acid (lemon/vinegar) and salt right at the end to wake up flavors.


