
Introduction
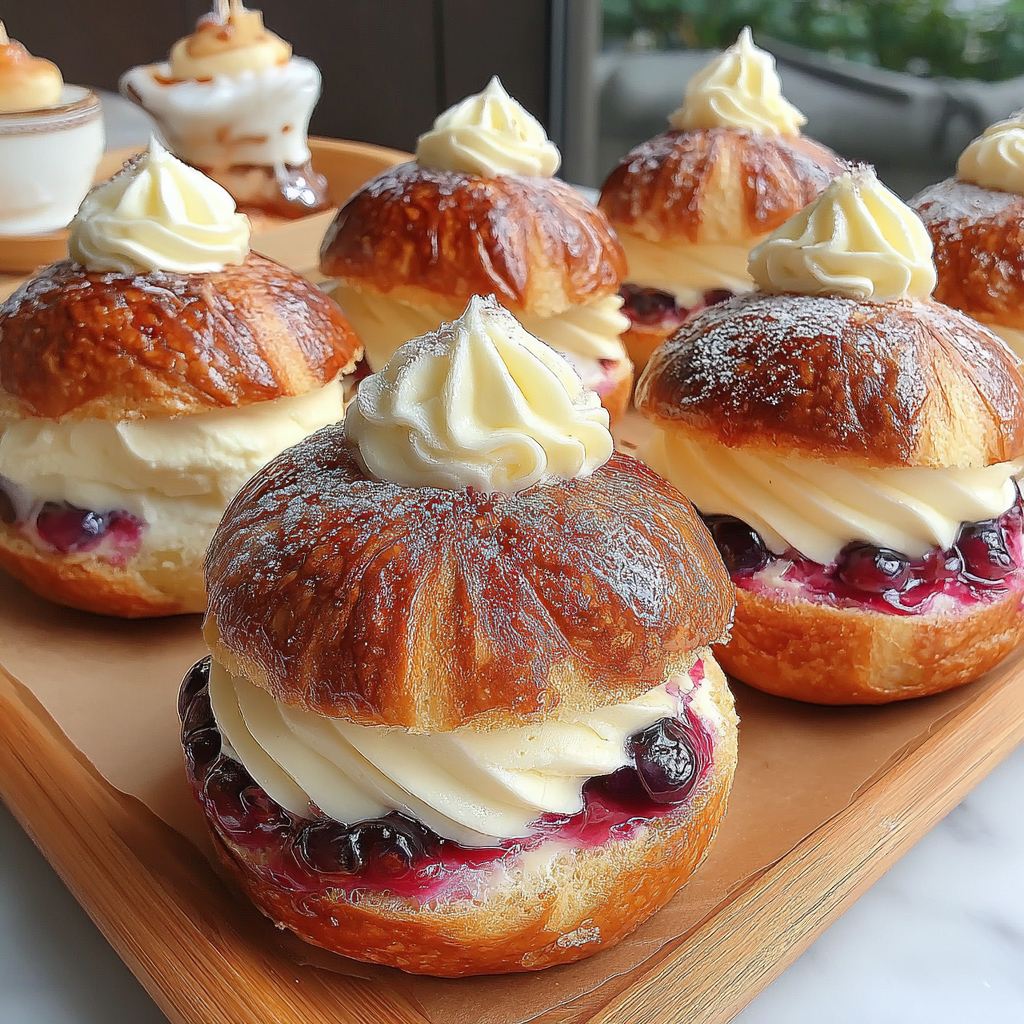
Danish Carnival Buns, known as 'Fastelavnsboller', are a cherished treat during the festive season in Denmark. These fluffy, sweet buns are traditionally filled with a delightful combination of cream and sometimes jam, making them a celebration staple. What sets this version apart is the addition of a rich vanilla cheesecake filling that elevates these treats to a whole new level of indulgence.
The process of making these buns is not only rewarding but also allows home cooks to connect with Danish culture and tradition. As the aroma of freshly baked buns permeates your kitchen, you'll find it difficult to resist sampling a batch warm from the oven. They are perfect for gatherings or cozy family afternoons, ensuring smiles all around.
Ingredients
- 500g all-purpose flour
Flour forms the base of the dough, providing structure and texture. All-purpose flour is versatile and yields soft, airy buns when combined with yeast. - 75g sugar
Sugar not only sweetens the dough, but it also helps to activate the yeast and contributes to browning during baking. - 2 tsp active dry yeast
Yeast is the leavening agent that causes the dough to rise, creating the light and fluffy texture that is characteristic of carnival buns. - 250ml whole milk
Milk enriches the dough, contributing moisture and a tender crumb. Warm milk helps to activate the yeast effectively. - 100g unsalted butter, melted
Butter provides richness and flavor while enhancing the overall tenderness of the bun. It also contributes to a golden crust. - 2 large eggs
Eggs add moisture and richness to the dough, while their proteins help structure the buns as they bake. - 1 tsp vanilla extract
Vanilla extract adds a warm, aromatic flavor that enhances the overall sweetness of the buns. - 250g cream cheese
Cream cheese serves as the filling base, providing a rich and creamy texture that contrasts beautifully with the fluffy bun. - 50g powdered sugar
Powdered sugar sweetens the cheesecake filling without adding graininess, helping to maintain a smooth texture. - 1 tsp vanilla extract (for cheesecake)
Additional vanilla extract in the cheesecake filling complements the flavors in the buns, creating a cohesive taste experience. - Whipped cream, for serving
Whipped cream adds a lightness and contrast to the dense cheesecake filling, making each bite even more enjoyable.
Directions & Preparation
Step 1: Activate the yeast.
In a small bowl, combine warm milk (about 37°C) with the sugar and yeast. Stir gently and let it sit for 5-10 minutes until frothy. This step is crucial as it ensures the yeast is active and ready to help your dough rise. If your mixture doesn’t bubble, it could indicate that your yeast is old, and you may need a fresh batch.
Step 2: Combine dry ingredients.
In a large mixing bowl, whisk together the flour and salt. This ensures that the salt is evenly distributed, which is vital for proper yeast function and flavor development. A homogenous mixture at this stage sets the foundation for a great dough.
Step 3: Mix wet ingredients.
In another bowl, mix the melted butter, eggs, and vanilla extract, then combine with the activated yeast mixture. This mix brings moisture and fat to the dough, which helps achieve a tender texture in the final buns.
Step 4: Form the dough.
Gradually add the wet ingredients to the dry ingredients, mixing until a soft dough forms. Knead the dough for about 10 minutes, either by hand or using a stand mixer with a dough hook. This step is crucial for developing gluten, resulting in airy and elastic buns.
Step 5: First rise.
Place the dough in a greased bowl, cover it with a damp cloth, and let it rise in a warm place for about an hour, or until doubled in size. This step allows the yeast to ferment and produce carbon dioxide, making the dough light and airy.
Step 6: Prepare the cheesecake filling.
While the dough rises, prepare the cheesecake filling by beating together the cream cheese, powdered sugar, and vanilla extract until smooth. This ensures that the filling is creamy without lumps, providing a pleasant experience when biting into the buns.
Step 7: Shape the buns.
Once the dough has risen, punch it down to release excess air. Divide it into equal portions (about 12), and flatten each piece into a disc. Place a generous tablespoon of the cheesecake filling in the center, fold the edges over, and roll into a ball. Shaping the buns this way traps the filling inside, ensuring a delightful surprise in every bite.
Step 8: Second rise.
Place the shaped buns seam-side down on a lined baking sheet, leaving space between them. Cover and let them rise again for about 30-40 minutes, allowing the flavors to develop further. This second rise is essential for achieving the desired fluffiness.
Step 9: Preheat the oven.
While the buns are rising, preheat the oven to 200°C (390°F). Properly preheating the oven ensures that the buns bake evenly and develop a beautiful golden crust.
Step 10: Bake the buns.
Bake the buns for 15-20 minutes until they are golden brown on top. This step allows for the Maillard reaction to occur, which creates that lovely color and flavor on the crust.
Step 11: Cool and serve.
Remove the buns from the oven and allow them to cool slightly on a wire rack. Serving them warm enhances the treat, and pairing with whipped cream brings an airy component that complements the dense cheesecake filling. Enjoy a delightful taste of Danish tradition!

The Cultural Significance of Fastelavnsboller
In Denmark, Fastelavn is celebrated with enthusiasm, especially with the tradition of eating Fastelavnsboller. This cultural event, marking the pre-Lenten season, brings communities together to enjoy these delectable treats. The buns symbolize joy and festivity, often shared during gatherings, reflecting the spirit of camaraderie and celebration that characterizes Danish culture.
Tips for Perfect Dough Texture
Achieving the right dough texture is crucial for the success of these buns. The dough should be soft and slightly tacky but not overly sticky. If it feels too wet, you can add a little more flour during kneading. Remember to allow the dough to rise in a warm environment, as temperature plays a key role in yeast activity and gluten development, resulting in light and fluffy buns.
Variations on the Classic Recipe
While the traditional filling often consists of whipped cream or custard, you can customize your Danish Carnival Buns in numerous ways. Consider adding fruit preserves, chocolate ganache, or even spices like cinnamon for a unique twist. These variations allow for personal creativity, making each batch a reflection of your taste and preference, while still honoring the classic Danish roots.
FAQs
What if the dough is too sticky?
If your dough feels too sticky, add a little more flour a tablespoon at a time until it reaches a workable consistency; be careful not to overdo it.
How can I make the filling sweeter?
To increase sweetness in the cheesecake filling, simply add more powdered sugar, tasting as you go to achieve the desired level of sweetness.
Can I use a different filling instead of cheesecake?
Absolutely! You can use jams or fruit preserves to fill the buns, or even chocolate or almond paste for a delicious variation.
Why are my buns deflating while baking?
If the buns deflate while baking, it could be due to insufficient rising time or over-kneading the dough. Ensure proper proofing and gentle handling.
What can I do if my buns turn out bland?
If the buns taste bland, it might be due to insufficient sugar or salt in the dough. Adjusting these ingredients in future batches will enhance flavors.
Can I scale the recipe up or down?
Yes, feel free to double or halve the recipe; just remember to adjust the baking time as needed, keeping an eye on the buns while they bake.
Conclusion
Danish Carnival Buns with Vanilla Cheesecake are more than just a dessert; they are a celebration of culture, flavor, and warmth. Each bun is a small work of art, encapsulating joy in every bite. It's a recipe that invites you to explore and indulge, making every baking session a delightful experience.
By following this recipe, you not only create a scrumptious treat but also foster the spirit of sharing and tradition that characterizes celebrations. So gather your loved ones, bake some buns, and enjoy a taste of Denmark right in your home.
Recipe Card
Danish Carnival Buns with Vanilla Cheesecake
Ingredients
Method
- Activate the yeast.
- Combine dry ingredients.
- Mix wet ingredients.
- Form the dough.
- First rise.
- Prepare the cheesecake filling.
- Shape the buns.
- Second rise.
- Preheat the oven.
- Bake the buns.
- Cool and serve.
Notes
Additional serving suggestions: pair with a crisp salad, garlic bread, or roasted seasonal vegetables for balance.
For make-ahead, prep components separately and assemble just before heating to preserve texture.
Taste and adjust with acid (lemon/vinegar) and salt right at the end to wake up flavors.


