Introduction
Imagine sinking your teeth into a delightful cookie that combines the refreshing taste of mint with the creamy texture of chocolate. Mint Chocolate Chip Snowball Cookies bring together these flavors in a fun, festive shape. They offer a wonderful treat for any occasion, from holidays to casual gatherings.
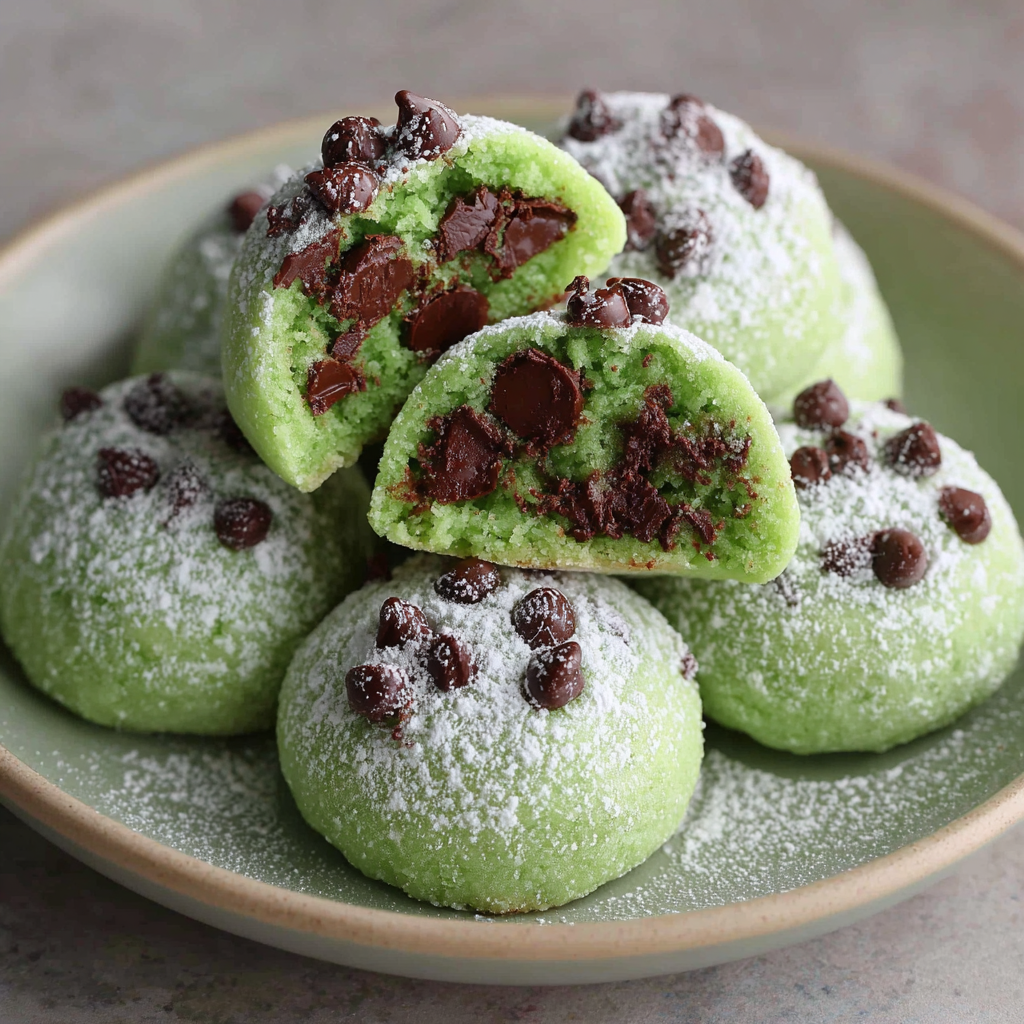
These cookies are not only delicious but also incredibly easy to make. With their snowy appearance and vibrant green flecks of mint, they’re sure to be a hit. Whether you’re baking for family or friends, these cookies will add a touch of whimsy and festive joy to your dessert table.
Ingredients
- 1 cup unsalted butter, softened
Butter adds richness and flavor to the cookies while providing a tender texture. Using unsalted butter allows you to control the overall saltiness of the cookies, ensuring a balanced taste. - 3/4 cup granulated sugar
Granulated sugar sweetens the cookies and helps with browning. It also contributes to the cookie's crispness on the outside while maintaining a soft center. - 1/4 cup powdered sugar
Powdered sugar not only adds sweetness but also helps to create that signature snowy appearance on the cookies. It gives a delicate finish that enhances their visual appeal. - 2 teaspoons pure vanilla extract
Vanilla extract adds a depth of flavor that complements the mint and chocolate. It enhances the overall aroma and taste, making the cookies more inviting. - 1 large egg
Eggs provide moisture and act as a binding agent in the cookie dough. They are essential for the cookies' structure, contributing to a chewy yet tender bite. - 2 cups all-purpose flour
Flour is the primary structure-building ingredient in the cookies. It provides the right balance to create a light and fluffy texture while allowing the cookies to hold their shape. - 1/2 teaspoon baking soda
Baking soda acts as a leavening agent, helping the cookies rise slightly as they bake. This contributes to their light texture and helps create a perfect bite. - 1/4 teaspoon salt
Salt enhances all the flavors in the cookies, making them taste more balanced. It helps offset the sweetness of the sugar, providing a rounded flavor profile. - 1/2 teaspoon peppermint extract
Peppermint extract intensifies the refreshing mint flavor, critical for these cookies. It gives them a distinct taste that is unmistakably minty and delightful. - 1 cup semi-sweet chocolate chips
Chocolate chips add a rich, creamy texture and an indulgent flavor to the cookies. They melt slightly in the oven, creating gooey pockets of chocolate in every bite. - 1/2 cup crushed candy canes (optional)
Crushed candy canes add a festive crunch and additional mint flavor. They provide a pop of color and a delightful texture contrast that elevates these cookies.
Directions & Preparation
Step 1: Preheat your oven to 350°F (175°C).
Preheating the oven ensures that the cookies bake at the right temperature from the start. This not only helps them rise properly but also contributes to a good texture and color. Allow at least 10-15 minutes for the oven to reach the desired heat before placing your cookies inside.
Step 2: In a large mixing bowl, cream together the softened butter, granulated sugar, and powdered sugar until light and fluffy.
Creaming the butter and sugars together incorporates air into the mixture, leading to a lighter cookie. This step is crucial because it affects the texture; under-creaming can result in dense cookies, while over-creaming may cause them to spread too much during baking.
Step 3: Add the vanilla extract, peppermint extract, and egg to the creamed mixture, beating until well combined.
Incorporating the extracts and egg at this stage infuses the cookie dough with essential flavors. The egg also helps bind the ingredients together, ensuring that everything is evenly mixed, which is vital for consistency across cookies.
Step 4: In a separate bowl, whisk together the flour, baking soda, and salt.
Mixing the dry ingredients separately ensures even distribution of the leavening agent and salt. This step prevents the cookies from developing unwanted lumps of salt or flat areas from unevenly distributed baking soda.
Step 5: Gradually add the dry ingredients to the wet mixture, mixing until just combined.
Gentle mixing at this stage is key. Over-mixing can develop the gluten in the flour, leading to tougher cookies. Aim for a dough that is slightly crumbly but holds together when pressed. This ensures a tender cookie texture upon baking.
Step 6: Fold in the chocolate chips and crushed candy canes if using.
Folding in the chocolate chips and candy canes adds bursts of flavor and texture throughout the cookie dough. This step is not just about mixing; it allows you to maintain the airiness of the dough while evenly distributing the add-ins.
Step 7: Using a cookie scoop or tablespoon, drop dough onto a lined baking sheet, spacing them about 2 inches apart.
Proper spacing is crucial for even baking, as cookies will spread during the process. Using a cookie scoop ensures uniformity in size, which helps them all bake at the same rate, providing a consistent texture and shaping.
Step 8: Bake in the preheated oven for 10-12 minutes, or until the edges are lightly golden.
Baking until the edges are just golden while the centers remain soft is a hallmark of a perfect cookie. This step is critical; removing them too early can lead to doughy centers, while baking too long will result in overly crispy cookies.
Step 9: Allow cookies to cool on the baking sheet for 5 minutes before transferring to a wire rack.
Cooling the cookies briefly on the baking sheet allows them to set before moving. This helps prevent breakage and ensures they maintain their shape. Transferring to a wire rack lets them cool completely, which is essential for achieving the right texture.
Step 10: Once cooled, dust with additional powdered sugar for that snowy effect.
The final dusting of powdered sugar enhances not just the visual appeal but also adds a touch of extra sweetness. This decorative step makes the cookies look more festive and inviting, perfect for sharing with friends and family during celebrations.

A Spark of Festivity with Every Bite
These Mint Chocolate Chip Snowball Cookies aren’t just a feast for the taste buds; they bring a festive flair to any dessert table. The colorful specks of candy canes peeking through the soft dough create a cheerful look that’s perfect for holiday gatherings. Each bite reveals a delightful crunch of chocolate chips, paired harmoniously with the coolness of mint, making them a sprightly addition to your treats.
Balancing Minty Freshness with Sweetness
The key to a successful Mint Chocolate Chip Snowball Cookie lies in achieving the right balance of mint and chocolate. The subtle bitterness of semi-sweet chocolate enhances the cookie's sweetness while tempering the boldness of peppermint. This harmony ensures that each bite is a showcase of flavors, allowing the minty freshness to linger pleasantly without overwhelming the palate.
Experimenting with Texture and Temperature
Texture can transform these cookies from delightful to extraordinary. Experimenting with the size of chocolate chips or even incorporating different types of chocolate can offer varied experiences. Additionally, serving them warm, just out of the oven, contrasts the coolness of the mint, creating a delicious interplay of warmth and chill that captivates your senses.
FAQs
What if my cookie dough seems too crumbly?
If your cookie dough appears too crumbly, try to add a teaspoon of milk or water gradually until it comes together. This can help bind the ingredients without compromising the texture.
Can I use white chocolate instead of semi-sweet chips?
Yes, substituting white chocolate chips will give the cookies a sweeter profile. Just keep in mind that the mint flavor will be more pronounced without the balancing bitterness of dark chocolate.
What if I want a stronger mint flavor?
For a stronger mint flavor, increase the peppermint extract in your dough by an additional half teaspoon. Just be cautious, as too much can overpower the other flavors.
Why did my cookies spread too much in the oven?
If the cookies spread too much, it may be due to melted butter. Ensure your butter is softened but not melted, and chilling the dough for 30 minutes before baking can help control spread.
How can I adjust the thickness of the cookies?
To change the thickness, you can adjust the flour slightly. Adding an extra tablespoon can make them thicker, whereas reducing flour can create thinner cookies, impacting their final texture.
What should I do if my cookies end up too sweet?
If your cookies taste too sweet, consider balancing them with a pinch of salt or serving with a side of whipped cream or yogurt. This can cut through the sweetness and enhance the overall flavor.
Conclusion
Mint Chocolate Chip Snowball Cookies are a delightful treat that brings all the charm of festive baking right into your home. With their unique combination of flavors and textures, they are bound to excite your taste buds and warm your spirits.
So gather your ingredients, invite your friends or family, and indulge in the joy of baking these wonderful cookies. They are sure to become a cherished recipe to revisit all year round.
Recipe Card

Mint Chocolate Chip Snowball Cookies Delight
Ingredients
Method
- Preheat your oven to 350°F (175°C).
- In a large mixing bowl, cream together the softened butter, granulated sugar, and powdered sugar until light and fluffy.
- Add the vanilla extract, peppermint extract, and egg to the creamed mixture, beating until well combined.
- In a separate bowl, whisk together the flour, baking soda, and salt.
- Gradually add the dry ingredients to the wet mixture, mixing until just combined.
- Fold in the chocolate chips and crushed candy canes if using.
- Using a cookie scoop or tablespoon, drop dough onto a lined baking sheet, spacing them about 2 inches apart.
- Bake in the preheated oven for 10-12 minutes, or until the edges are lightly golden.
- Allow cookies to cool on the baking sheet for 5 minutes before transferring to a wire rack.
- Once cooled, dust with additional powdered sugar for that snowy effect.
Notes
Additional serving suggestions: pair with a crisp salad, garlic bread, or roasted seasonal vegetables for balance.
For make-ahead, prep components separately and assemble just before heating to preserve texture.
Taste and adjust with acid (lemon/vinegar) and salt right at the end to wake up flavors.


